- Details
- Category: JConnect News
If you have thought of an updating facility within your website, this blog will guide you to create an update server for Joomla's update system.
A. Create or Edit an update stream
Goto your Akeeba Release System's control panel, you will find the Update stream logo.
![]()
Update stream is a relationship between the extension release inside the specified category.
Stream Name : A name for the update stream. It can be anything you want and is only used in the Joomla! 1.6 XML format streams.
Note : This is what Joomla! will also display in the Extension Name when it lists new available updates.
Alias : Used to construct the URL in the front-end. Keep it short and sweet.
Extension type : This is what type of your extension.
Category : The category where we're going to look for updates.
Package naming pattern : An update stream looks for files following a specific naming convention. You need to provide a filename and use a single question mark (?) to match any single character or a single start (*) to match any number of characters. Only items whose File or URL field matches this pattern will be included in the update stream.
For instance, if installation packages are named com_example-VERSIONNUMBER-core.zip, where only VERSIONNUMBER changes, i.e. com_example-3.1-core.zip, com_example-3.1.5-core.zip etc. This leads us to a naming pattern of com_example-*-core.zip .
Element : This is required for Joomla! 1.6 update streams. It should contain the name of your extension, e.g. com_something, mod_something, plg_something etc.
Site area (client_id) : All update streams must indicate the site area (frontend or backend) the extension applies to. Forcomponent, library and file extensions you must always use "Backend". For plugins, modules and templates select "Frontend" or "Backend" depending on whether your extension applies to the frontend or the backend of your clients' sites respectively.
Folder (for plugins) : For all extension types except plugins, leave this blank. For plugins, this must be set to the plugin type. For example, if you have a system plugin, type insystem in this box. If you have a content plugin, type in content in this box.
JED Extension ID : This is optional and only needs to be entered for extensions listed in the Joomla! Extensions Directory (JED). This is the numeric ID of your extension as listed in the JED. This is used for the Install from Web feature integration. For more information please take a look at the Content - Akeeba Release System Latest Version plugin which contains the plumbing to actually provide the URLs you need to use for the (quite convoluted) Install from Web feature.
Published : The status of the stream, also unpublished streams result in empty pages.
B. Setup update server in your extension
This definition can be used in all Joomla! 2.5 and newer compatible extensions but is not available for templates. You can use two options for your server type; collection or extension. These will be explained in detail shortly. This code should be added to the extension manifest file, within the root "extension" element. The update server is defined as follows for each type:
<updateservers>
<server type="extension" priority="1" name="SocialAds updates"><![CDATA[https://www.example.com/index.php?option=com_ars&view=update&task=stream&format=xml&id=1&dummy=extension.xml]]></server>
</updateservers>
Allowing your user to upgrade extensions with restricted downloads
Most of us developers want to provide downloads that are not openly accessible to the public. All you have to do is to create component parameters in your component's config.xml file. If you want to use username/password pairs, add the following lines after your <params> tag:
<field name="downloadid" type="text" default="" size="30"
label="Download ID"
description ="Enter your Download ID to enable Live Updates" />
<field name="username" type="text" default="" size="30"
label="Username"
description ="Enter the username to our site in order to enable Live Updates" />
<field name="password" type="text" default="" size="30"
label="Password"
description ="Enter the password to our site in order to enable Live Updates" />
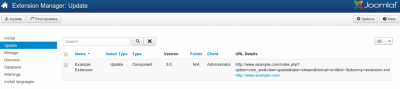
Finally you can check for update by going to Extension Manager -> Update
Read more https://techjoomla.com/joomla-development/setting-up-update-streams-with-ars.html
- Details
- Category: JConnect News
<div dir="ltr" style="text-align: left;" trbidi="on">
Zoo is Joomla's one of the best CCK extension. It's flexible and powerful content application builder to manage your content. Zoo allows to import data in JASON or CSV format. Data import done in following 3 stages.
<br />
1) Upload CSV file.
<div class="separator" style="clear: both; text-align: center;"><a href="https://2.bp.blogspot.com/-GOvQMMOE5Ec/Ui8VbGn--MI/AAAAAAAAAvM/96_pu-r7cUc/s1600/upload_file.gif" imageanchor="1" style="margin-left: 1em; margin-right: 1em;"><img border="0" src="https://2.bp.blogspot.com/-GOvQMMOE5Ec/Ui8VbGn--MI/AAAAAAAAAvM/96_pu-r7cUc/s200/upload_file.gif" /></a></div>
<br />
2) Select delimiters.Type in the field separator and the field enclosure of the CSV file.
<div class="separator" style="clear: both; text-align: center;"><a href="https://1.bp.blogspot.com/-7yxvwrgdeRQ/Ui8VtnLr-jI/AAAAAAAAAvc/aM7DgZxFu6k/s1600/select_delimeters.gif" imageanchor="1" style="margin-left: 1em; margin-right: 1em;"><img border="0" src="https://1.bp.blogspot.com/-7yxvwrgdeRQ/Ui8VtnLr-jI/AAAAAAAAAvc/aM7DgZxFu6k/s200/select_delimeters.gif" /></a></div>
<br />
3) Assign the submission fields to the appropriate CSV files columns. Here you have to assign the data in your CSV file to an item type of the app.
<div class="separator" style="clear: both; text-align: center;"><a href="https://3.bp.blogspot.com/-U3WB_WnaROA/Ui8V0Un6JKI/AAAAAAAAAvk/spWwPMSQbeo/s1600/map_fields.jpeg" imageanchor="1" style="margin-left: 1em; margin-right: 1em;"><img border="0" src="https://3.bp.blogspot.com/-U3WB_WnaROA/Ui8V0Un6JKI/AAAAAAAAAvk/spWwPMSQbeo/s200/map_fields.jpeg" /></a></div>
1st & 2nd stage of data importing is very easy & straight forward where as 3rd stage will be depends on how many submission fields you have map to the appropriate CSV files columns. Its fine, if you have to map 4-5 fields but what if you wanna map 20-30 fields & you want to upload large data. This stage kills you.
Here we have solution for you. You just have to override administrator/components/com_zoo/views/configuration/tmpl/importcsv.php file. Add a Auto Map button & some script on click of Auto Map button in the file. That's it.
Lets add the button first. Put this code anywhere you want to see the Auto Map button on page.
<pre class="brush: csharp">
<input type="button" id="automap" name="automap" value="Auto Mapp" />
</pre>
Add the following Jquery script.
<pre class="brush: csharp">
$("#automap").click(function(){
$("li.assign").each(function(){
var catname = $(this).find("span.name").text();
if($(this).find('select.assign option').filter(function () { return $(this).html().toLowerCase() == catname.toLowerCase(); }).val()){
$(this).find('select.assign option').filter(function () { return $(this).html().toLowerCase() == catname.toLowerCase(); }).attr("selected","selected");
//$(this).find('select.assign').css("border", "1px solid green");
}else{
$(this).find('select.assign option').each(function(){
var crval = $(this).text().toLowerCase();
catname = catname.toLowerCase();
//console.log(crval.split(catname).length);
if(crval.split(catname).length > 1 ){
$(this).attr("selected","selected");
$(this).closest("select.assign").css("border", "1px solid red");
}else if(catname.split(crval).length > 1){
$(this).attr("selected","selected");
$(this).closest("select.assign").css("border", "1px solid red");
}
})
}
});
});
</pre>
<br /></div>
Read more https://techjoomla.com/joomla-development/zoo-csv-import-assign-fields-automatically.html
- Details
- Category: JConnect News
A little time ago I had to fix a tricky conflict between two VirtueMart add-ons, namely OnePageCheckout and Finalize.
By fixing tha, i learned an important lesson on how to write your plugin. So I definitely think the all process it's worth sharing.
One Page Checkout for VirtueMartj
Made by Rupostel[1], OPC is a very handy suite of extensions for VirtueMart (component + plugin) that keeps your checkout process in one page.
Truth to be told, the code could do with a bit of refactoring, but it does its job and has a nice selection of themes to suit all tastes.
Of course it's quite complex because it has to control many parts of the checkout.
This - we'll see in a minute - it's one of the cause for the conflict.
Finalize for VirtueMart
Made by DayCounts[2], Finalize is a much simpler plugin that lets your user restart the payment process for pending order.
In other words, when a customer is looking at her order details and that order is still pending payment, she can see all the available methods to complete the payment.
In the e-commerce world, making life easier for customers is very important and this plugin is a reccomended add-on.
The conflict
OPC is so complex that it has its own hooks; when some things happen in the component, some events are launched so that other parts of the component may be invoked.
One of this event is named getPaymentMethods.
Finalize it's much simpler and only does a few things on core Joomla events: onAfterDispatch, onBeforeRender and onAfterRender.
But... it has also a few helper methods.
By "helper method", I refer to all methods in a plugin which are not directly hooked to an event (if you know a bit about writing Joomla plugins you know what I mean, if not stay tuned because I may write something about it soon).
And by sheer coincidence, one of this methods is called "getPaymentMethods".
And since the Finalize plugin is a system plugin, it's always loaded; and when OPC launch the "getPaymentMethods" event, Finalize respond as well - but it's not supposed to.
Uh-oh, checkout broken.
Who's fault is this?
I do not like very much the choice of "getPaymentMethods" for an event name. And this is not a trivial sin: the more I learn about development, the more I can see that correct naming[3] is one of the most important things.
But then again, creating a public helper method in your plugin class is also questionable.
So the important lesson for DayCounts, myself and everyone who writes Joomla plugins:
- in your plugin main file, only event handlers methods should be public, all other should be private
- even better, create a separated helper class so that your plugin main file contains only event handlers
Conclusions
The quickest fix in this case was just to rename the method in the Finalize plugin as finalizeGetPaymentMethods, and change the one line of code that called it.
We already mentioned this to the DayCounts people so they should fix it in the next versions.
I hope everything was clear enough, if you have questions or want to add your thoughts please feel free to comment below!
References
- Details
- Category: JConnect News
Another example of the fact that the best solutions are developed because of practical issues. We were tweaking a Magento site for better sales conversion, but when customizing the success page (the page shown after the order has been completed) things got annoying: After a refresh, the cart was empty and we were redirected away from the success page. We developed an extension[1] to tackle the issue.
The issue explained more thoroughly
Let's reiterate: When a customer completes an order in Magento, he is redirected to the succes page (with the URL checkout/success). This page shows a bit of information like which order was completed, and that the customer receives some mail. But there are various opportunities to pick up on this page:
- Thank the customer for the purchase
- Add product-specific details that the customer might need
- Invite the customer to share product information through social media (Facebook, twitter)
There might be many more tricks that can be applied to this page, but you'll get the picture: If you are sales minded, you will want to modify this page. So you modify the underlying PHTML-template templates/checkout/success.phtml and refresh the page. Damn, instead of viewing the modified contents, you are redirected back to the empty cart page and your order information is gone.
Making an extension to improve testing things like this
The normal solution would be to repeat the entire procedure. So, add products to the cart, go to the checkout, complete all steps in the checkout and end up on the success page again. If you are making tiny modifications, this process is time consuming and quite annoying. We at Yireo hate that. So we created a simple but effective extension to solve this issue once and for all: Yireo CheckoutTester[2].
The free CheckoutTester[3] extension allows you to preview the success page under a specific URL. Even better, you can take any order already placed in your shop and use that as preview data of the success page. Now, every time when you modify the success page, you can simply navigate to the CheckoutTester URL and refresh the page as many times as you like. Testing made smarter. If you are customizing Magento to increase conversion, this is a must have. And it is free.
References
- ^ extension (www.yireo.com)
- ^ CheckoutTester (www.yireo.com)
- ^ CheckoutTester (www.yireo.com)
Read more https://www.yireo.com/blog/1672-testing-the-magento-checkout-success-page
- Details
- Category: JConnect News

We are pleased to announce the immediate release of version 6.5.8. This is a maintenance release which contains a few important fixes!
Google Chrome recently decided to add a width style to the hr tag when moved to a different position on the page for some reason. This can obviously be annoying as it breaks Joomla's 'Read more' feature. To address this we have developed a workaround for our users. The other issue was with Admin Tools by Akeeba. In their latest version they renamed there framework from "FOF" to "F0F". This directly affected our handshake with AdminTool Pro when setting up the editor .htaccess rules.
So please upgrade and make your users happy.
References
- ^ Download... (www.joomlackeditor.com)
Read more https://www.joomlackeditor.com/about/329-welcome-to-version-658