- Details
- Category: Developer News

Happy Holidays from everyone here at Extly!
Read more https://www.extly.com/blog/22-latest-news/799-happy-holidays-and-best-wishes-for-2024.html
- Details
- Category: Developer News
We recently introduced the new Superapp SDK (yay!), which empowers businesses to create seamless digital experiences for their customers and employees. Whether you’re looking to better manage and engage employees or want to create a one-stop ecommerce experience, superapps are the answer. However, creating them has historically been tedious– until now. Ionic’s Superapp SDK simplifies the process of creating a superapp, and our recent webinar covered all the details. From the mobile app landscape to real-world examples of superapps in action, this webinar was packed with tons of actionable information.
Couldn’t make it? No worries, we’ve got a recording handy and you can read on for a summary of what you missed.
The state of apps today
We’re constantly checking our phones, be it for emails, text messages, news, clocking in and out of work, and more. If you’ve ever felt overwhelmed by the sheer volume of apps needed day to day, you’re not alone – in fact, the average digital worker uses 11 applications to complete their tasks (up from just 6 in 2019).
As that number keeps growing, it’s becoming increasingly clear that a streamlined system could save lots of time and headaches. According to the Anatomy of Work Global Index by Asana, 9.6 hours a week could be saved if there was an improved process of working with multiple apps.
Employees aren’t the only ones feeling app overload though – from ordering food to chatting with friends, think about how many apps you use in a given day. However, we seem to offload apps as quickly as we get them, with the retention rate of Android apps at only 2.6% after 30 days and 4.3% after 30 days for iOS users.
Lastly, the teams building these apps are siloed and burnt out, trying to meet ever-changing demands while also trying to improve development processes. Conflicting release cycles lead to bottlenecks, resulting in releases and updates being held back and users being just as confused as the devs themselves. So how can we solve app overload?
Enter superapps
According to Gartner, a superapp is an app that provides end-users with a set of core features plus access to independently created mini apps, which are discovered and activated by users, and can also be easily removed from the UI. That means that superapps are endlessly customizable and can grow (or shrink) with your/your users’ needs.
Superapps enable complete digital transformation. Development teams that are used to working in silos can now work in parallel, contributing features/mini apps to a superapp as they’re ready, without waiting on other teams. Additionally, many parts of the superapp and mini apps can be reused throughout the application, such as authentication managed at the native shell layer, with additional functionality added as needed. This also means that superapps can easily scale with a business, without needing to create something new from scratch.
On the user side, they get an all-in-one experience without having to manage tons of different apps and logins. Everything an end user needs to get their tasks done, be it an employee or consumer, is in one singular place. With one application able to do so much, this increases the chances of retaining users, as they’re less likely to abandon an app that has functionality critical to their daily tasks. Superapps ultimately create a better user experience for all parties.
Ionic’s Superapp SDK
If you’re thinking that creating a superapp is probably super complicated, you’d only be half right. Historically, they’ve been tricky to create – until now, that is. Thanks to Ionic’s Superapp SDK, you can now create superapps with less hassle than ever before.
The Superapp SDK drastically simplifies the process of bringing a superapp to fruition, arming you with the necessary tools at each phase of the software development lifecycle. That means you can build, deploy, and update your superapp in a fraction of the time it would take to create it from scratch.
Ionic’s Superapp SDK enables developers to create core functionality, such as payment processing and login authentication, within native iOS and Android shells. If app experiences are already built using web technology, the SDK provides a solution to bridge that native and web gap for optimal code reuse. As the app is built out and it’s time to add mini apps, built into the SDK is the capability to leverage any web technology stack or framework of your choosing. Moving toward deployment, you’ll be equipped with the services to create the necessary web bundles and native binaries that are necessary for delivery to the end user. Lastly, the SDK has a built-in feature to update mini apps independently, which makes A/B testing and bug fixes much smoother.
The SDK also provides a complete mini app development toolkit. Included is an off-the-shelf design system that’s adaptive by nature. This means the visual components of your mini apps will adjust to the look-and-feel of the end user’s operating system. Pop ups, scrolling gestures, animations and more can be seamlessly integrated to create delightful user experiences.
Superapp SDK in action
If you’re still not convinced of the benefits that superapps can bring to your organization, then check out this demo of our Supernova app, a superapp that we built in house to put our money where our mouth is.
And don’t worry, we’re not the only ones using the Superapp SDK to build superapps. Our webinar highlighted two large companies building their own superapps today.
EGYM is a global fitness technology leader that provides fitness and health facilities with intelligent workout solutions built on a robust ecosystem of connected gym equipment and software. They needed to be able to provide their gym customers with fully customizable app solutions that are unique to each gym. With the help of Ionic’s Superapp SDK, they did just that. By using the SDK, they were able to build features once and deploy them to each customer. They kept the core functionality like login access in the native shell, which saved room for each partnering gym to create unique mini app experiences for their gym’s users. Because each mini app is independently written, there is no need to follow a joint shipping schedule.
Additionally, a global leader in the health and beauty space recently used Ionic’s Superapp SDK to build out an internal superapp for their front-line employees. In just under 5 months, the company was able to create an application that could be deployed all over the world. The app allows employees to check inventory, order products, and more. It has even increased face-time with customers by 20%, due to the speed and efficiency of the app, which ultimately leads to happy employees and more satisfied customers.
Learn more
If you’d like to learn more about superapps we recently released a whole ebook with everything you need to know. This comprehensive ebook covers all things superapps – from benefits and considerations of building them to how real enterprises are currently using them.
We also have lots of superapps content, from how superapps can improve the employer and employee experience to how they can enable smoother mergers & acquisitions.
Get in touch with our team to learn more and start building your superapp proof-of-concept today.
The post Recap: Introducing the Superapp SDK appeared first on Ionic Blog.
Read more https://ionic.io/blog/recap-introducing-the-superapp-sdk
- Details
- Category: Developer News
Today we’re excited to announce the release of the Capacitor 6 beta! This new version of Capacitor is following quickly on the heels of Capacitor 5 and is setting the stage for a suite of upgrades we have planned over the next several months.
Before the next phase of enhancements, we had to lay important groundwork. This includes creating our new release cadence, which will provide a smoother update experience for developers. You can expect to see bug fixes and improvements to the platforms as we maintain support with app store requirements and a new iteration to your iOS projects. Let’s dive into the details.
Android and iOS Updates
Android 14 and iOS 17 were released earlier this year and Capacitor 6 is bringing support for these platforms to your applications! Our focus here has been on compatibility, so several plugins have been updated to build and run correctly when targeting the new OS versions. Upgrading your application to Capacitor 6 means that when the app stores start requiring the newer versions of their SDKs, your application will already be compatible with those requirements.
Swift Package Manager
In Capacitor 6, we’re introducing an alternative to cocoapods for iOS dependency management, Swift Package Manager (SPM). SPM is the official package manager for iOS code written using the newer Swift language. Support for this new package manager for iOS projects in Capacitor 6 is experimental. As we get closer to the final release of Capacitor 6, we’ll have more information regarding why we feel introducing support for SPM is important to Capacitor and what it will mean for your applications.
Give it a spin
Want to live life on the edge? The bleeding edge, that is. Then give this beta a spin in your application. Check out our upgrade guide here to upgrade your application to Capacitor 6.
The post Capacitor 6 Beta Now Available appeared first on Ionic Blog.
Read more https://ionic.io/blog/capacitor-6-beta-now-available
- Details
- Category: Developer News
This is a guest post from Simon Grimm, Ionic Developer Expert and educator at the Ionic Academy, an online school with 70+ video courses focused entirely on building awesome mobile apps with Ionic and Capacitor!
With Angular v17, the Angular team introduced many groundbreaking changes to how you can write powerful and performant Angular apps.All these changes are available in Ionic as well, and in this tutorial, we’ll take a look at how you can use them to build modern Angular apps with Ionic.
By the end of this tutorial, you will know how to:
- Use the new Angular Control Flow
- Work with Signals
- Use Deferred Blocks
- Import Ionic Standalone Components
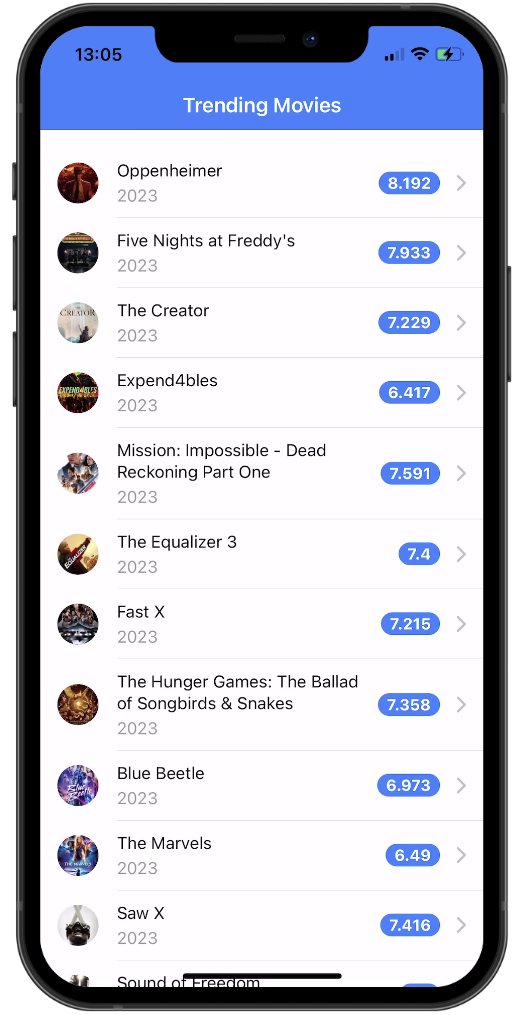
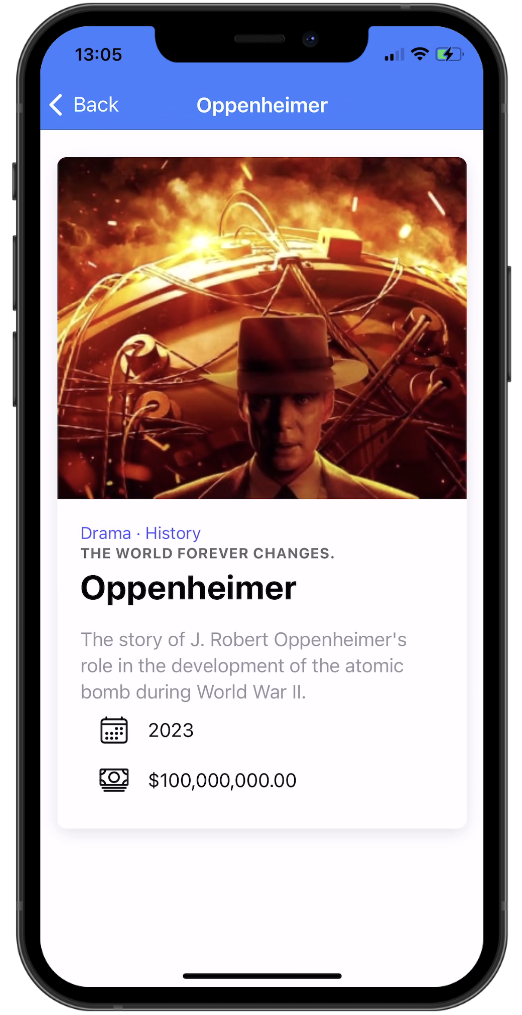
We will build a simple movie app that shows a list of trending movies and allows us to view the details of each movie, as below.
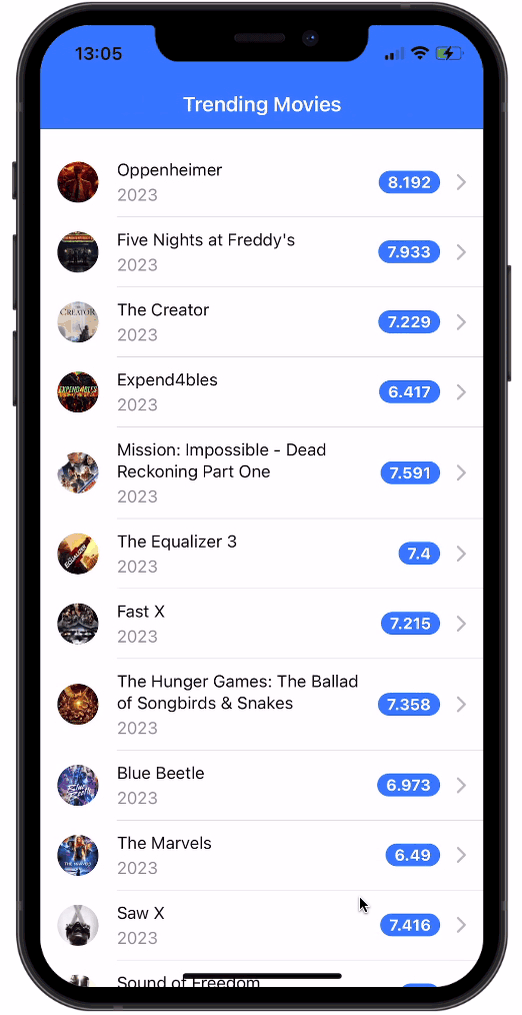
You can also find the full source code on GitHub. Now roll up your sleeves, and let’s get started!
Setting up the Project with Angular 17
To get started, bring up a terminal, create a new Ionic app, and
navigate into the project folder. We will use the blank template
and the --type angular flag to create an Angular app –
make sure you pick Standalone Components when asked about how you
want to build your app!
ionic start modernApp blank --type angular

cd ./modernApp

ionic g service services/movie

ionic g page details
Additionally we generate a service to fetch the movie data and a
details page to show the details of a movie. To correctly make HTTP
calls, we can now add the provideHttpClient to the
src/main.ts as we don’t have a main module
anymore:
import { enableProdMode, importProvidersFrom } from '@angular/core';
import { bootstrapApplication } from '@angular/platform-browser';
import { RouteReuseStrategy, provideRouter, withComponentInputBinding } from '@angular/router';
import { IonicRouteStrategy, provideIonicAngular } from '@ionic/angular/standalone';

import { routes } from './app/app.routes';
import { AppComponent } from './app/app.component';
import { environment } from './environments/environment';
import { provideHttpClient } from '@angular/common/http';

if (environment.production) {
  enableProdMode();
}

bootstrapApplication(AppComponent, {
  providers: [
    { provide: RouteReuseStrategy, useClass: IonicRouteStrategy },
    provideIonicAngular(),
    provideRouter(routes, withComponentInputBinding()),
    provideHttpClient(),
  ],
});
In addition to provideHttpClient, we also added
withComponentInputBinding to the
provideRouter call to enable the automatic binding of
route parameters to components. We’ll come back to this once we
build the details page.
Angular ESBuild
To make use of all of the powerful new features of Angular 17, we can now enable ESBuild, which makes building our app much faster.
To do so, we need to change the
@angular-devkit/build-angular:browser package to
@angular-devkit/build-angular:application, end then
rename the main property to browser inside the
angular.json:
"architect": {
        "build": {
          "builder": "@angular-devkit/build-angular:application",
          "options": {
            "browser": "src/main.ts",
            "polyfills": ["src/polyfills.ts"],
Additionally, polyfills is now an array, and you
need to remove buildOptimizer &
vendorChunk from the configurations block. With all of
that in place, you are now on the fastest possible Angular
build!
Adding the Movie Database API
To follow along with this tutorial, you also need to get an API key for the The Movie Database API.
Simply create an account and request one for free, then open the
src/environments/environment.ts file and add your API
key:
export const environment = {
  production: false,
  apiKey: 'YOURKEY',
};
If you create a production build later, also update the
src/environments/environment.prod.ts file with that
key.
Creating a Service
To use Typescript in the best possible way, I like to generate Typescript interfaces based on JSON responses from APIs using this VSC Extension.
In our case, this results in some interfaces we can rename and
put into a new src/app/services/interfaces.ts
file:
export interface ApiResult {
  page: number;
  results: any[];
  total_pages: number;
  total_results: number;
}

export interface MovieResult {
  adult: boolean;
  backdrop_path: string;
  belongs_to_collection?: any;
  budget: number;
  genres: Genre[];
  homepage: string;
  id: number;
  imdb_id: string;
  original_language: string;
  original_title: string;
  overview: string;
  popularity: number;
  poster_path: string;
  production_companies: Productioncompany[];
  production_countries: Productioncountry[];
  release_date: string;
  revenue: number;
  runtime: number;
  spoken_languages: Spokenlanguage[];
  status: string;
  tagline: string;
  title: string;
  video: boolean;
  vote_average: number;
  vote_count: number;
}

interface Spokenlanguage {
  english_name: string;
  iso_639_1: string;
  name: string;
}

interface Productioncountry {
  iso_3166_1: string;
  name: string;
}

interface Productioncompany {
  id: number;
  logo_path?: string;
  name: string;
  origin_country: string;
}

interface Genre {
  id: number;
  name: string;
}
Now we can create a new service to fetch the movie data from the API. Services haven’t changed much, but they don’t have to: React developers would love to have a singleton service construct to inject anywhere!
Services structure our Angular app, split up view and business
logic and make it easy to share data between components. Enough of
the praise, let’s implement our service to make two API calls
inside the src/app/services/movie.service.ts:
import { HttpClient } from '@angular/common/http';
import { Injectable } from '@angular/core';
import { delay } from 'rxjs/operators';
import { Observable } from 'rxjs/internal/Observable';
import { ApiResult, MovieResult } from './interfaces';
import { environment } from 'src/environments/environment';

const BASE_URL = 'https://api.themoviedb.org/3';
const API_KEY = environment.apiKey;

@Injectable({
  providedIn: 'root',
})
export class MovieService {
  private http = inject(HttpClient);

  constructor() {}

  getTopRatedMovies(page = 1): Observable<ApiResult> {
    return this.http
      .get<ApiResult>(`${BASE_URL}/movie/popular?page=${page}&api_key=${API_KEY}`)
      .pipe(
        delay(2000) // Simulate slow network
      );
  }

  getMovieDetails(id: string): Observable<MovieResult> {
    return this.http.get<MovieResult>(`${BASE_URL}/movie/${id}?api_key=${API_KEY}`);
  }
}
As we use the latest and greatest, we now also moved the dependency injection to the class level by using inject directly.
Using the new Angular Control Flow
We can now start building our app by adding a new page to show the list of trending movies, based on the data we get from our MovieService. Additionally, we will now add imports for all Ionic components that we will later use in our view.
Why? Because we can, thanks to Ionic 7.5!
Instead of importing all Ionic components, we can now pick the
ones we actually need from the
@ionic/angular/standalone package and include them in
our Angular standalone components. While this does add a few lines
to our imports, it also makes it easier to see which components we
actually use in our view. Additionally, this makes loading pages
faster and reduces the final bundle size of our app.
We now need one function to load the trending movies, and another one to load more movies when we scroll to the bottom of the list which triggers the infinite scroll event.
Go ahead by changing the src/app/home/home.page.ts
to:
import { Component, OnInit, inject } from '@angular/core';
import {
  IonHeader,
  IonToolbar,
  IonTitle,
  IonContent,
  InfiniteScrollCustomEvent,
  IonBadge,
  IonLabel,
  IonAvatar,
  IonItem,
  IonList,
  IonLoading,
  IonInfiniteScroll,
  IonInfiniteScrollContent,
  IonSkeletonText,
  IonAlert,
} from '@ionic/angular/standalone';
import { MovieService } from '../services/movie.service';
import { DatePipe } from '@angular/common';
import { RouterModule } from '@angular/router';
import { catchError, finalize } from 'rxjs';

@Component({
  selector: 'app-home',
  templateUrl: 'home.page.html',
  styleUrls: ['home.page.scss'],
  standalone: true,
  imports: [
    IonHeader,
    IonToolbar,
    IonTitle,
    IonContent,
    IonLabel,
    IonBadge,
    IonAvatar,
    IonItem,
    IonList,
    IonLoading,
    IonInfiniteScroll,
    IonInfiniteScrollContent,
    IonSkeletonText,
    IonAlert,
    DatePipe,
    RouterModule,
  ],
})
export class HomePage implements OnInit {
  private movieService = inject(MovieService);

  private currentPage = 1;
  public movies: any[] = [];
  public imageBaseUrl = 'https://image.tmdb.org/t/p';
  public isLoading = true;
  public error = null;
  public dummyArray = new Array(5);

  // Load the first page of movies during component initialization
  ngOnInit() {
    this.loadMovies();
  }

  async loadMovies(event?: InfiniteScrollCustomEvent) {
    this.error = null;

    // Only show loading indicator on initial load
    if (!event) {
      this.isLoading = true;
    }

    // Get the next page of movies from the MovieService
    this.movieService
      .getTopRatedMovies(this.currentPage)
      .pipe(
        finalize(() => {
          this.isLoading = false;
        }),
        catchError((err: any) => {
          this.error = err.error.status_message;
          return [];
        })
      )
      .subscribe({
        next: (res) => {
          // Append the results to our movies array
          this.movies.push(...res.results);

          // Resolve the infinite scroll promise to tell Ionic that we are done
          event?.target.complete();

          // Disable the infinite scroll when we reach the end of the list
          if (event) {
            event.target.disabled = res.total_pages === this.currentPage;
          }
        },
      });
  }

  // This method is called by the infinite scroll event handler
  loadMore(event: InfiniteScrollCustomEvent) {
    this.currentPage++;
    this.loadMovies(event);
  }
}
Nothing too crazy going on here, so let’s move to the view now. The new Angular Control Flow is a powerful feature that allows us to write cleaner and more readable code.
It’s based on the @if and @for
directives, which are similar to the *ngIf and
*ngFor directives, but with some important
differences.
The @if directive is used to conditionally render a
block of code, and it can be used just as you would expect – but
inside the HTML:
@if (condition) { ... }

@else if { ... }

@else { ... }
The second new directive is @for, which is used to
iterate over an array and render a block of code for each item in
the array:
@for (item of items; track item.id) { ... }The track keyword is used to tell Angular how to track the items
in the array, and it’s required when using @for.
Let’s build a view around our isLoading state and the value from our API call:
- If we are loading, we show a list of six Ionic skeleton items
- If we have an error, we show an Ionic inline alert with the error message
- When we have an array, we show a list of movies
- When the array is empty and we finished loading, we show a message that no movies were found.
Bring up the src/app/home/home.page.html now and
change it to:
<ion-header>
  <ion-toolbar color="primary">
    <ion-title>Trending Movies</ion-title>
  </ion-toolbar>
</ion-header>

<ion-content>
  @if (isLoading) {
  <ion-list class="ion-padding-top">
    @for (i of dummyArray; track i) {
    <ion-item lines="none" class="ion-padding-bottom">
      <ion-avatar slot="start">
        <ion-skeleton-text></ion-skeleton-text>
      </ion-avatar>
      <ion-skeleton-text animated style="height: 40px" />
    </ion-item>
    }
  </ion-list>
  } @else if (error) {
  <ion-alert
    header="Error"
    [message]="error"
    isOpen="true"
    [buttons]="['Ok']"
  />
  }

  <ion-list class="ion-padding-top">
    @for (item of movies; track item.id) {
    <ion-item button [routerLink]="['/details', item.id]">
      <ion-avatar slot="start">
        <img [src]="imageBaseUrl + '/w92' + item.poster_path" />
      </ion-avatar>

      <ion-label class="ion-text-wrap">
        <h3>{{ item.title }}</h3>
        <p>{{ item.release_date | date:'y' }}</p>
      </ion-label>

      <ion-badge slot="end"> {{ item.vote_average }} </ion-badge>
    </ion-item>
    }
    @empty {
      @if (!isLoading) {
      <ion-item lines="none">
        <ion-label class="ion-text-center">No movies found</ion-label>
      </ion-item>
      }
    }
  </ion-list>

  <ion-infinite-scroll (ionInfinite)="loadMore($event)">
    <ion-infinite-scroll-content
      loadingSpinner="bubbles"
      loadingText="Loading more data..."
    />
  </ion-infinite-scroll>
</ion-content>
If you added your API key correctly, you should now see a list of trending movies.
Congratulations on using the new Angular Control Flow with Ionic! You are now officially among the cool kids. Clicking on one of the movies should take us to the details page, so let’s work on that now.
Working with Signals
In the beginning, the CLI automatically changed our routing, but we need to include the :id parameter manually now.
Open up the src/app/app.routes.ts file and change
it to:
import { Routes } from '@angular/router';

export const routes: Routes = [
  {
    path: 'home',
    loadComponent: () => import('./home/home.page').then((m) => m.HomePage),
  },
  {
    path: '',
    redirectTo: 'home-defer',
    pathMatch: 'full',
  },
  {
    path: 'details/:id', // <-- Add the :id parameter
    loadComponent: () =>
      import('./details/details.page').then((m) => m.DetailsPage),
  },
  {
    path: 'home-defer',
    loadComponent: () =>
      import('./home-defer/home-defer.page').then((m) => m.HomeDeferPage),
  },
];
Now the buttons in our list work, and we are able to retrieve
the id parameter from the URL on the details page. Remember how we
added the withComponentInputBinding to the
provideRouter call in the src/main.ts?
This is where it comes into play!
We can now use the @Input decorator to bind the id
parameter to a variable in our details page, and the set function
will be called whenever the value changes.
This makes it really easy for us to immediately load the movie details when the id changes!
On top of that we will also use the new signal function to create a Signal that we can use in our view to show the movie details.
Not really required here, but I wanted to show you how to use Signals! The usage is really easy:
- Create a new Signal with
signal<T>(initialValue) - Set the value with
set(newValue) - Get the value by calling the
signal()
Open the src/app/details/details.page.ts now and
change it to:
import {
  Component,
  Input,
  WritableSignal,
  inject,
  signal,
} from '@angular/core';
import { MovieService } from '../services/movie.service';
import { MovieResult } from '../services/interfaces';
import {
  IonBackButton,
  IonButtons,
  IonCard,
  IonCardContent,
  IonCardHeader,
  IonCardSubtitle,
  IonCardTitle,
  IonContent,
  IonHeader,
  IonIcon,
  IonItem,
  IonLabel,
  IonText,
  IonTitle,
  IonToolbar,
} from '@ionic/angular/standalone';
import { CurrencyPipe, DatePipe } from '@angular/common';
import { addIcons } from 'ionicons';
import { cashOutline, calendarOutline } from 'ionicons/icons';

@Component({
  selector: 'app-details',
  templateUrl: './details.page.html',
  styleUrls: ['./details.page.scss'],
  standalone: true,
  imports: [
    IonHeader,
    IonToolbar,
    IonTitle,
    IonContent,
    IonIcon,
    IonCard,
    IonCardHeader,
    IonCardTitle,
    IonCardSubtitle,
    IonCardContent,
    IonText,
    IonLabel,
    IonButtons,
    IonBackButton,
    IonItem,
    CurrencyPipe,
    DatePipe,
  ],
})
export class DetailsPage {
  private movieService = inject(MovieService);
  public movie: WritableSignal<MovieResult | null> = signal<MovieResult | null>(
    null,
  );
  public imageBaseUrl = 'https://image.tmdb.org/t/p';

  // Load the movie details when the id changes through the URL :id parameter
  @Input()
  set id(movieId: string) {
    // This is just to show Signal usage
    // You could also just assign the value to a variable directly
    this.movieService.getMovieDetails(movieId).subscribe((movie) => {
      this.movie.set(movie);
    });
  }

  constructor() {
    // Load the the required ionicons
    addIcons({
      cashOutline,
      calendarOutline,
    });
  }
}
Almost forgot another change of Ionic standalone components: We can manually add the icons we need to the addIcons function, which will then be included in the final bundle.
Now we can use the movie signal in our view to show the movie details.
We will also use the new control flow again and cast the movie
signal to a variable with as movie to make it easier
to work with.
Open up the src/app/details/details.page.html file
and change it to:
<ion-header>
  <ion-toolbar color="primary">
    <ion-buttons slot="start">
      <ion-back-button defaultHref="/"></ion-back-button>
    </ion-buttons>
    <ion-title>{{ movie()?.title }}</ion-title>
  </ion-toolbar>
</ion-header>

<ion-content>
  @if (movie(); as movie) {
  <ion-card>
    <div
      [style.height.px]="300"
      [style.background-image]="'url(' + imageBaseUrl + '/w400' + movie?.poster_path + ')'"></div>

    <ion-card-header>
      <ion-card-title> {{ movie?.title }} </ion-card-title>
      <ion-card-subtitle> {{ movie.tagline }} </ion-card-subtitle>
      <ion-text color="tertiary">
        @for (g of movie.genres; track g.id; let isLast = $last;) {
        <span> {{ g.name }} {{ !isLast ? '·' : '' }}</span>
        }
      </ion-text>
    </ion-card-header>
    <ion-card-content>
      <ion-label color="medium">{{ movie.overview }}</ion-label>

      <ion-item lines="none">
        <ion-icon name="calendar-outline" slot="start"></ion-icon>
        <ion-label>{{ movie.release_date | date: 'y'}}</ion-label>
      </ion-item>

      <ion-item lines="none">
        <ion-icon name="cash-outline" slot="start"></ion-icon>
        <ion-label>{{ movie.budget| currency: 'USD' }}</ion-label>
      </ion-item>
    </ion-card-content>
  </ion-card>
  }
</ion-content>
Hidden inside is also another iteration over the genres of the movie. As you can see, stuff like isLast is still available just like before!
That means, everything you learned about Angular in the past is still valuable and can be used with the new Angular 17 features.
Working with Deferred Blocks
The last thing we want to do is to add a new page that uses a deferred block – one of the coolest additions of Angular 17!
A deferred block is a block of code that is only rendered when a condition is met.
That means, we can use it to show a loading indicator or skeleton while we are loading data, and then show the actual data when it’s available.
Ok, that’s nothing new. We could do that before, right?
Well, the great thing is that now the deferred template is not loaded until required!
This means, the items will not appear in the DOM before, which can massively improve performance.
There’s even a block @loading which describes the
transition from empty state to the actual data, which makes it
great for SSR. Let’s build a new page that uses a deferred block to
show a list of trending movies, based on the code from our previous
page.
Bring up the
src/app/home-defer/home-defer.page.html file and
change it to:
<ion-header>
  <ion-toolbar color="primary">
    <ion-title>Trending Movies</ion-title>
  </ion-toolbar>
</ion-header>

<ion-content>
  @defer (when !isLoading) {
  <ion-list>
    @for (item of movies; track item.id) {
    <ion-item button [routerLink]="['/details', item.id]">
      <ion-avatar slot="start">
        <img [src]="imageBaseUrl + '/w92' + item.poster_path" alt="poster" />
      </ion-avatar>

      <ion-label class="ion-text-wrap">
        <h3>{{ item.title }}</h3>
        <p>{{ item.release_date | date:'y' }}</p>
      </ion-label>

      <ion-badge slot="end"> {{ item.vote_average }} </ion-badge>
    </ion-item>
    }
    @empty {
      @if (!isLoading) {
      <ion-item lines="none">
        <ion-label class="ion-text-center">No movies found</ion-label>
      </ion-item>
      }
    }
  </ion-list>

  <ion-infinite-scroll (ionInfinite)="loadMore($event)">
    <ion-infinite-scroll-content
      loadingSpinner="bubbles"
      loadingText="Loading more data..."
    />
  </ion-infinite-scroll>
  }
  @placeholder {
    <ion-list class="ion-padding-top">
      @for (i of dummyArray; track i) {
      <ion-item lines="none" class="ion-padding-bottom">
        <ion-avatar slot="start">
          <ion-skeleton-text></ion-skeleton-text>
        </ion-avatar>
        <ion-skeleton-text animated style="height: 40px" />
      </ion-item>
    }
  </ion-list>
  }
  @error {
    <ion-alert
      header="Error"
      [message]="error"
      isOpen="true"
      [buttons]="['Ok']"
    />
  }
  @loading(minimum 2s) {
    Transition to list....
  }
</ion-content>
It’s mostly the same, but we now use the @defer
directive to only render the list and infinite scroll when we are
not loading anymore.
Additionally, we use the @placeholder directive to
show the skeleton items while we are loading.
The @error directive is used to show the error
message, and the @loading directive is used to show a
transition message while we go from placeholder to deferred
block.
Things like this make Angular 17 a great choice for building modern apps, and Ionic remains the most popular UI framework to build mobile apps with Angular and Capacitor!
Conclusion
In this tutorial, we learned how to use the new Angular Control Flow, Signals, and Deferred Blocks to build a modern Angular app with Ionic.We also learned how to use the new Ionic standalone components to only include the components we actually use in our app.
Ionic is ready for the latest updates of Angular 17, and if you want to get the most performance out of your app, you should definitely give it a try and upgrade your apps to the latest version!
If you want to learn more about Ionic, make sure to check out the Ionic Academy, an online school with 70+ video courses focused entirely on building awesome mobile apps with Ionic and Capacitor.
The post Building Modern Angular Apps with Ionic and Standalone Components appeared first on Ionic Blog.
Read more https://ionic.io/blog/building-angular-apps-with-ionic-and-standalone-components
- Details
- Category: Developer News
Mergers and acquisitions (M&A) are equal parts exciting and challenging for businesses. When it comes to mobile app development teams, the integration of different technologies, infrastructure alignment, and management of multiple applications can feel overwhelming.
The challenge of integrating and merging technologies doesn’t have to be cumbersome. Rather, effective M&A deals result from organizations taking decisions on the future of their IT systems early. Superapps, which combine disparate digital experiences into one, can help streamline the integration process. In fact, Bain & Company reports that “… the best acquirers move quickly when integrating to a single set of systems.”
Let’s dive into the technological impact of M&A and how superapps can offer a lifeline for mobile app development teams.
The technological impact of M&A
M&A activities can reshape technology ecosystems entirely, especially when it comes to mobile applications. A few challenges that development teams often face are:
1. Integration complexities: Merging organizations often have different tech stacks, backend systems, and databases. Bringing all these pieces together into a single infrastructure requires careful planning, data mapping, and migration.
2. User experience disruptions: For internal apps, getting employees to adopt new tools can lead to reduced productivity and added confusion around which technology to use. For public-facing apps, migrating to a new platform can introduce unnecessary disruption and negatively impact their experience, potentially causing them to look for other options. Providing a consistent experience throughout the integration process is vital to keeping your users happy.
3. Data consolidation and security: Post-merger, lots of data needs to be consolidated and secured. Ensuring the accuracy, integrity, and privacy of sensitive data during the integration process is critical.
4. Infrastructure alignment: Combining IT infrastructures, networks, and data centers can be a daunting task. Standardizing and streamlining the infrastructure is key to optimizing resources and reducing operational costs.
5. Resource allocation and time constraints: M&A activities demand significant time and budget. Balancing ongoing operations, projects, and integration tasks within tight timelines puts pressure on the development team.
The superapp solution
Enter superapps: a potential solution to tackle the challenges that teams face during M&A. Here’s how they can help:
1. Simplified integration: Superapps bring together the functionalities of merging organizations’ mobile apps into one platform, making the integration process smoother. Development teams can focus on integrating and maintaining a single app, reducing complexity and saving time.
2. Seamless user experience: Superapps provide a unified and consistent user experience by offering a single entry point for various services. Users can access multiple functionalities within one app, eliminating the need to juggle between different applications.
3. Data consolidation and security: With superapps, data can be transferred and consolidated within the app’s backend systems. By reducing attack vectors and minimizing the authentication and authorization touchpoints surrounding the app, developers can ensure that the newly formed pool of data will remain secure.
4. Scalability and flexibility: Superapps are designed to grow with your organization. They provide a flexible framework to easily integrate new services or features, ensuring your app ecosystem can adapt to changing business needs and scale effortlessly.
5. Simplified maintenance and support: Managing a single superapp is typically easier than dealing with disparate applications. Development teams can concentrate their efforts on maintaining and enhancing a single codebase, reducing the complexity of managing multiple apps.
Get started with the Superapp SDK
Mergers and acquisitions can be complex, but there are ways to make them easier on development teams. Superapps can bring order to what otherwise feels like chaos. By unifying functionalities, ensuring a seamless user experience, and simplifying consolidation and maintenance efforts, superapps offer a streamlined path to successful integration.
The benefits don’t end with the development team. As Statista found when surveying consumers in leading global markets, consumers agree that superapps not only provide convenience benefits, but they value the coordination of important features and functions being in one place and feel more secure operating within a single platform.
The Superapp SDK by Ionic embraces the power of superapps and empowers development teams to navigate the challenges of M&A, unlocking the full potential of a merged organization’s mobile app ecosystem.
The post Superapps for Simplified Mergers & Acquisitions appeared first on Ionic Blog.
Read more https://ionic.io/blog/superapps-for-simplified-mergers-acquisitions