- Details
- Category: Dev News
People have been talking about the best way to sort your utility classes in Tailwind projects for at least four years. Today we’re excited to announce that you can finally stop worrying about it with the release of our official Prettier plugin for Tailwind CSS.

This plugin scans your templates for class attributes containing Tailwind CSS classes, and then sorts those classes automatically following our recommended class order.
<!-- Before -->
<button class="text-white px-4 sm:px-8 py-2 sm:py-3 bg-sky-700 hover:bg-sky-800">...</button>

<!-- After -->
<button class="bg-sky-700 px-4 py-2 text-white hover:bg-sky-800 sm:px-8 sm:py-3">...</button>
It works seamlessly with custom Tailwind configurations, and because it’s just a Prettier plugin, it works anywhere Prettier works — including every popular editor and IDE, and of course on the command line.
To get started, just install
prettier-plugin-tailwindcss as a dev-dependency:
npm install -D prettier prettier-plugin-tailwindcssThis plugin follows Prettier’s autoloading convention, so as long as you’ve got Prettier set up in your project, it’ll start working automatically as soon as it’s installed.
At it’s core, all this plugin does is organize your classes in the same order that Tailwind orders them in your CSS.
This means that any classes in the base layer will be sorted first, followed by classes in the components layer, and then finally classes in the utilities layer.
<!-- `container` is a component so it comes first -->
<div class="container mx-auto px-6">
  <!-- ... -->
</div>
Utilities themselves are sorted in the same order we sort them in the CSS as well, which means that any classes that override other classes always appear later in the class list:
<div class="pt-2 p-4"><div class="p-4 pt-2"> <!-- ... --></div>The actual order of the different utilities is loosely based on the box model, and tries to put high impact classes that affect the layout at the beginning and decorative classes at the end, while also trying to keep related utilities together:
<div class="text-gray-700 shadow-md p-3 border-gray-300 ml-4 h-24 flex border-2 "><div class="ml-4 flex h-24 border-2 border-gray-300 p-3 text-gray-700 shadow-md"> <!-- ... --></div>Modifiers like hover: and focus: are
grouped together and sorted after any plain utilities:
<div class="hover:opacity-75 opacity-50 hover:scale-150 scale-125"><div class="scale-125 opacity-50 hover:scale-150 hover:opacity-75"> <!-- ... --></div>Responsive modifiers like md: and lg:
are grouped together at the end in the same order they’re
configured in your theme — which is smallest to largest by
default:
<div class="lg:grid-cols-4 grid sm:grid-cols-3 grid-cols-2"><div class="grid grid-cols-2 sm:grid-cols-3 lg:grid-cols-4"> <!-- ... --></div>Any custom classes that don’t come from Tailwind plugins (like classes for targeting a third-party library) are always sorted to the front, so it’s easy to see when an element is using them:
<div class="p-3 shadow-xl select2-dropdown "><div class="select2-dropdown p-3 shadow-xl"> <!-- ... --></div>
We think Prettier gets it right when it comes to being opinionated and offering little in terms of customizability — at the end of the day the biggest benefit to sorting your classes is that it’s just one less thing to argue with your team about.
We’ve tried really hard to come up with a sort order that is easy to understand and communicates the most important information as fast as possible.
The plugin will respect your
tailwind.config.js file and work with any Tailwind
plugins you’ve installed, but there is no way to change the
sort order. Just like with Prettier, we think that the
benefits of auto-formatting will quickly outweigh any stylistic
preferences you have and that you’ll get used to it pretty
fast.
Ready to try it out? Check out the full documentation on GitHub →
(The post Automatic Class Sorting with Prettier appeared first on Tailwind CSS Blog.)
Read more https://tailwindcss.com/blog/automatic-class-sorting-with-prettier
- Details
- Category: Dev News

The post TALL Stack Admin Panel: Lean Admin Sneak Peek appeared first on Laravel News.
Join the Laravel Newsletter to get Laravel articles like this directly in your inbox.
Read more https://laravel-news.com/lean-admin-sneak-peek
- Details
- Category: Dev News

The post Deploy your PHP Codebase with Ansible and GitHub Actions appeared first on Laravel News.
Join the Laravel Newsletter to get Laravel articles like this directly in your inbox.
Read more https://laravel-news.com/deploy-your-php-app-with-ansible-and-github-actions
- Details
- Category: Dev News
Integrating your social media presence with your WordPress.com website has never been easier. We offer many options and tools that are available on all plans, at no additional cost. Whether you want to auto-share your website posts to a social media platform, display your social media posts on your website, provide links to your various accounts, or encourage your website visitors to share your content, we’ve got what you need to connect with your audience.
Posting to Social Media
All WordPress.com plans include Publicize, a feature that lets you automate posting to Facebook, Twitter, LinkedIn, and Tumblr. When you set up and configure these social media accounts to your site, every new post you publish will automatically post to the platforms you’ve selected. This is a great way to repurpose your website content on your social channels, reach your audience where they already are, and drive traffic to your site.

It’s important to note that Publicize cannot push posts to Instagram since Instagram doesn’t allow auto-posting from third-party services. However, if you’re on the Business plan or ecommerce plan, then you could consider using a third-party automation tool such as Buffer or Hootsuite, both of which can be connected to your WordPress.com site using plugins. There may be other tools that offer this feature as well, though you’ll want to research their limitations and plans to learn more.*
*Please note that third-party tools and plugins are outside the scope of WordPress.com support.
Social Media Feeds on Your Site
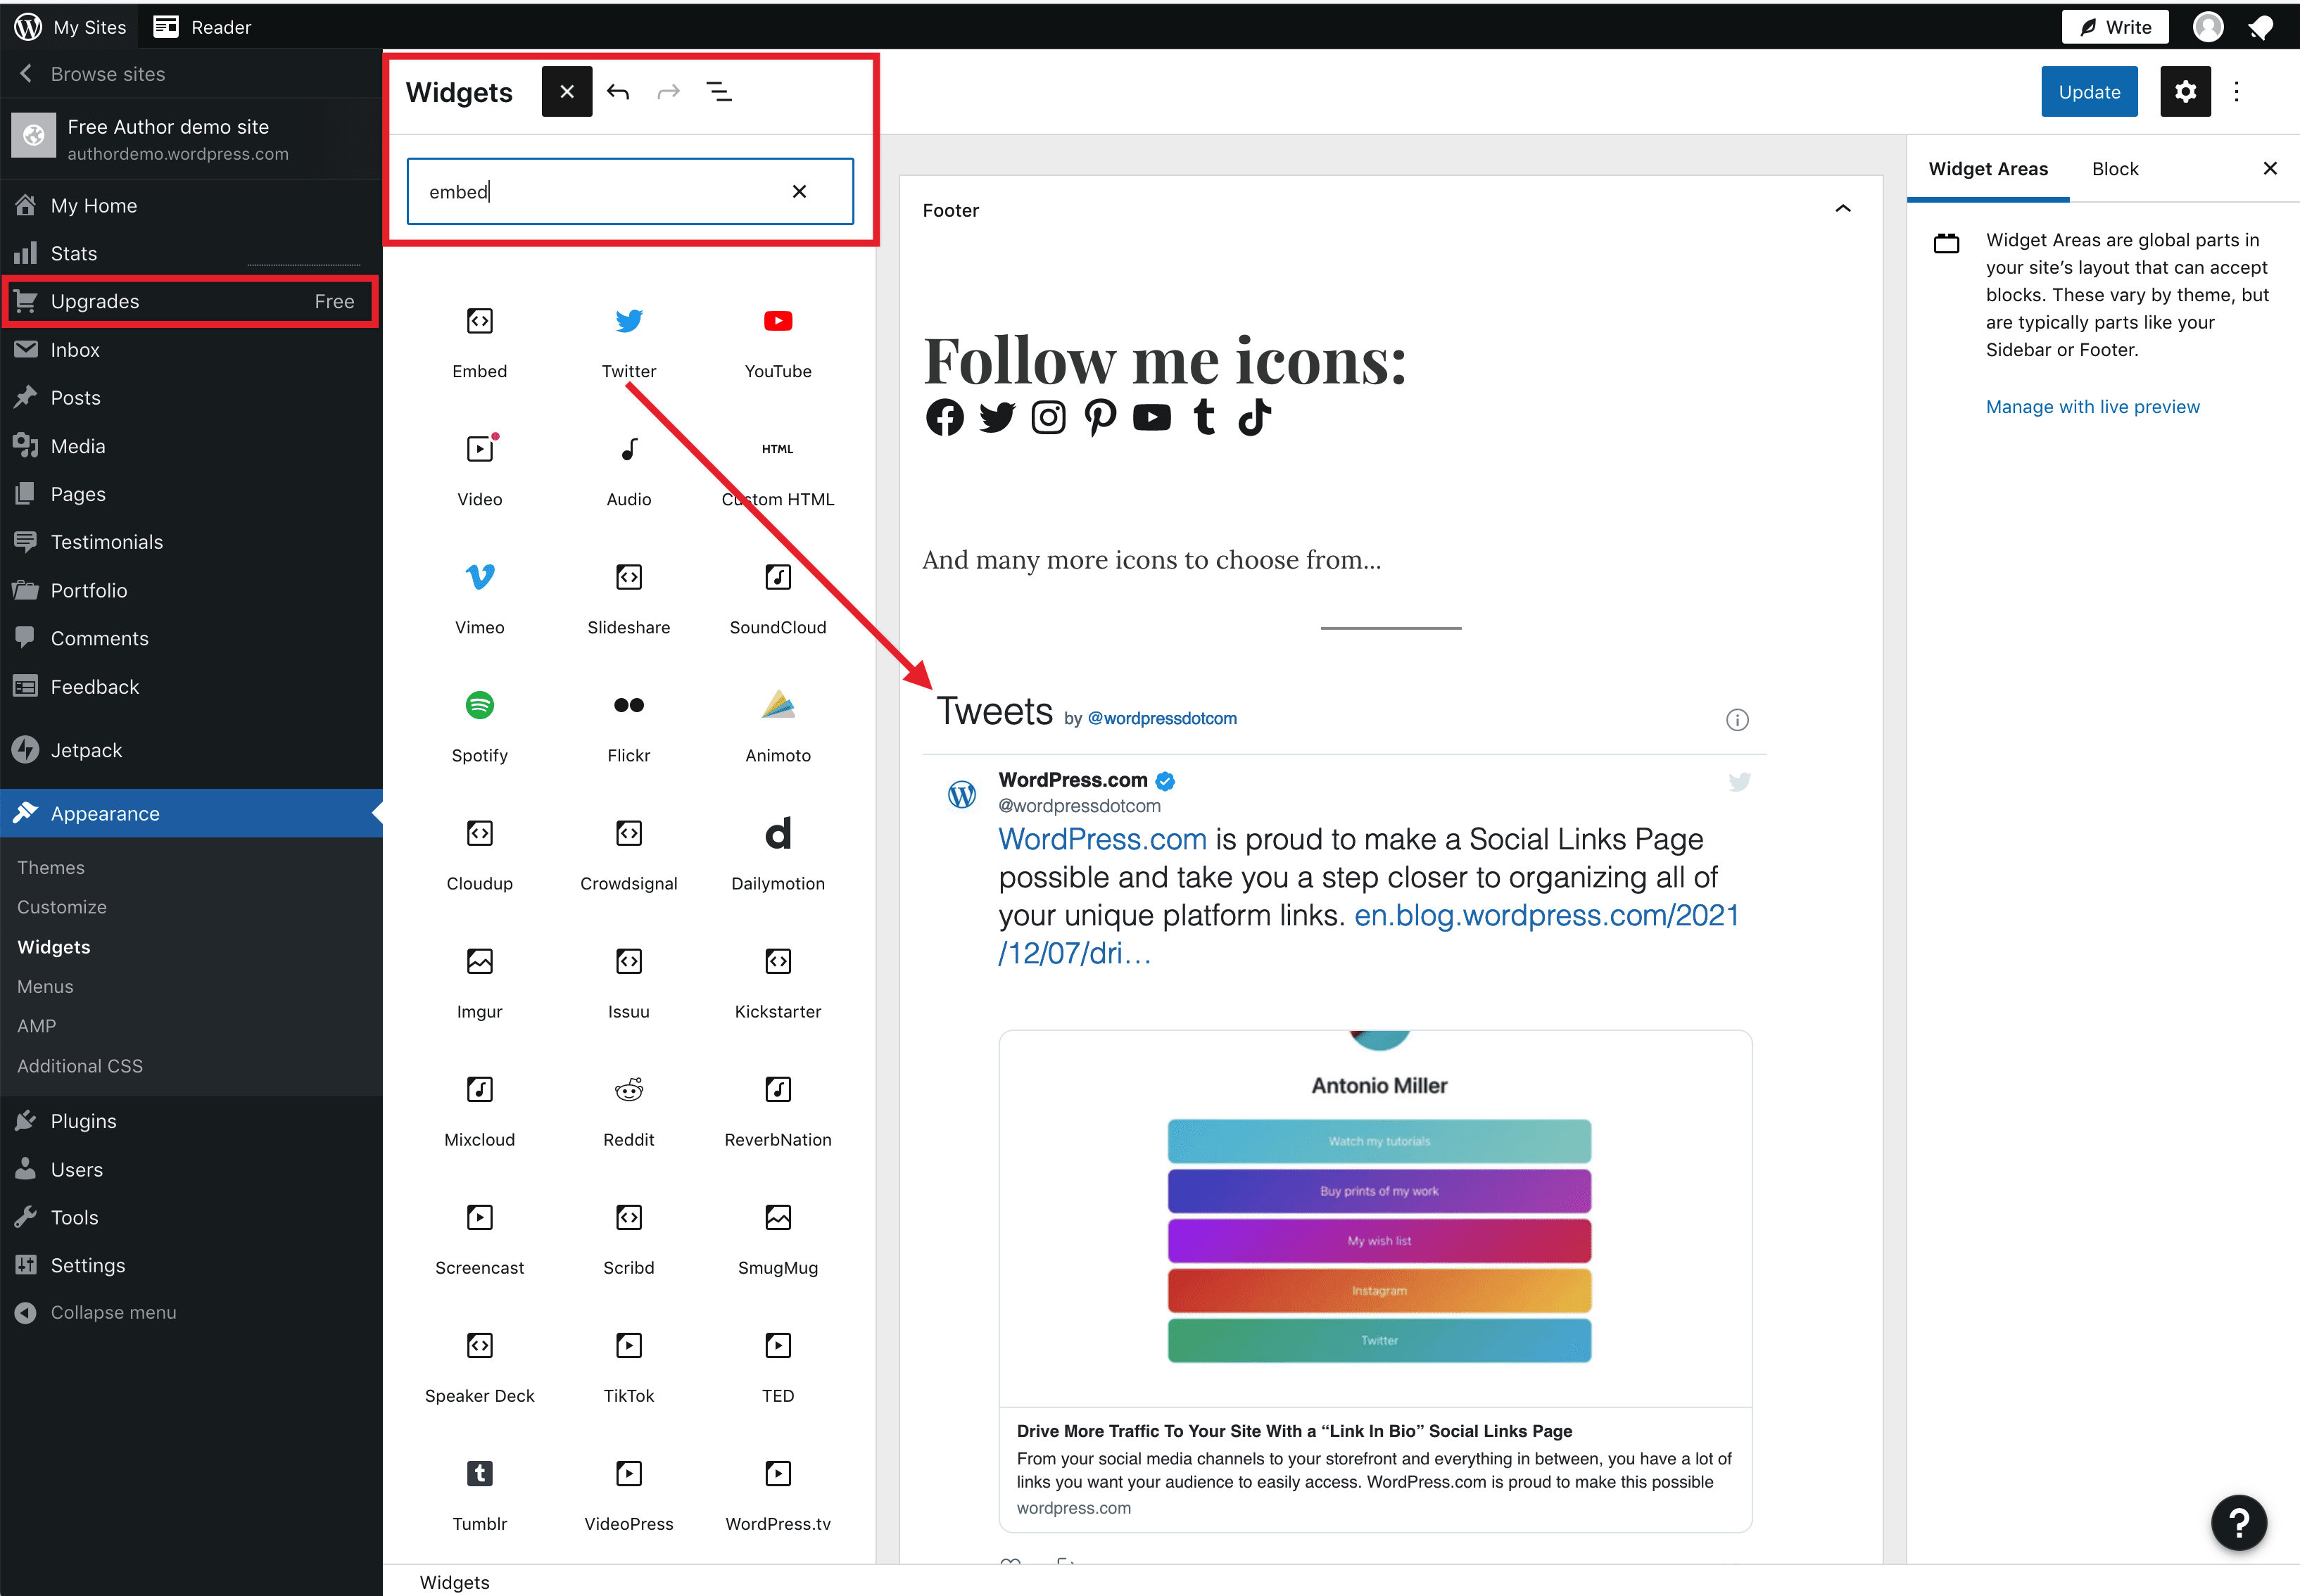
Another option that WordPress.com offers is displaying your social media platforms on your website. You can add widgets, blocks, or feeds to your WordPress.com site to display posts from your social media accounts in real-time. This can help you stay connected with your audience when they’re taking a break from social media, but still checking your site.
WordPress.com offers built-in features for displaying your social media feeds from Instagram, Facebook, Twitter, Pinterest, and TikTok, to name a few. We also provide a number of support documents to help walk you through the options for these embedding features.
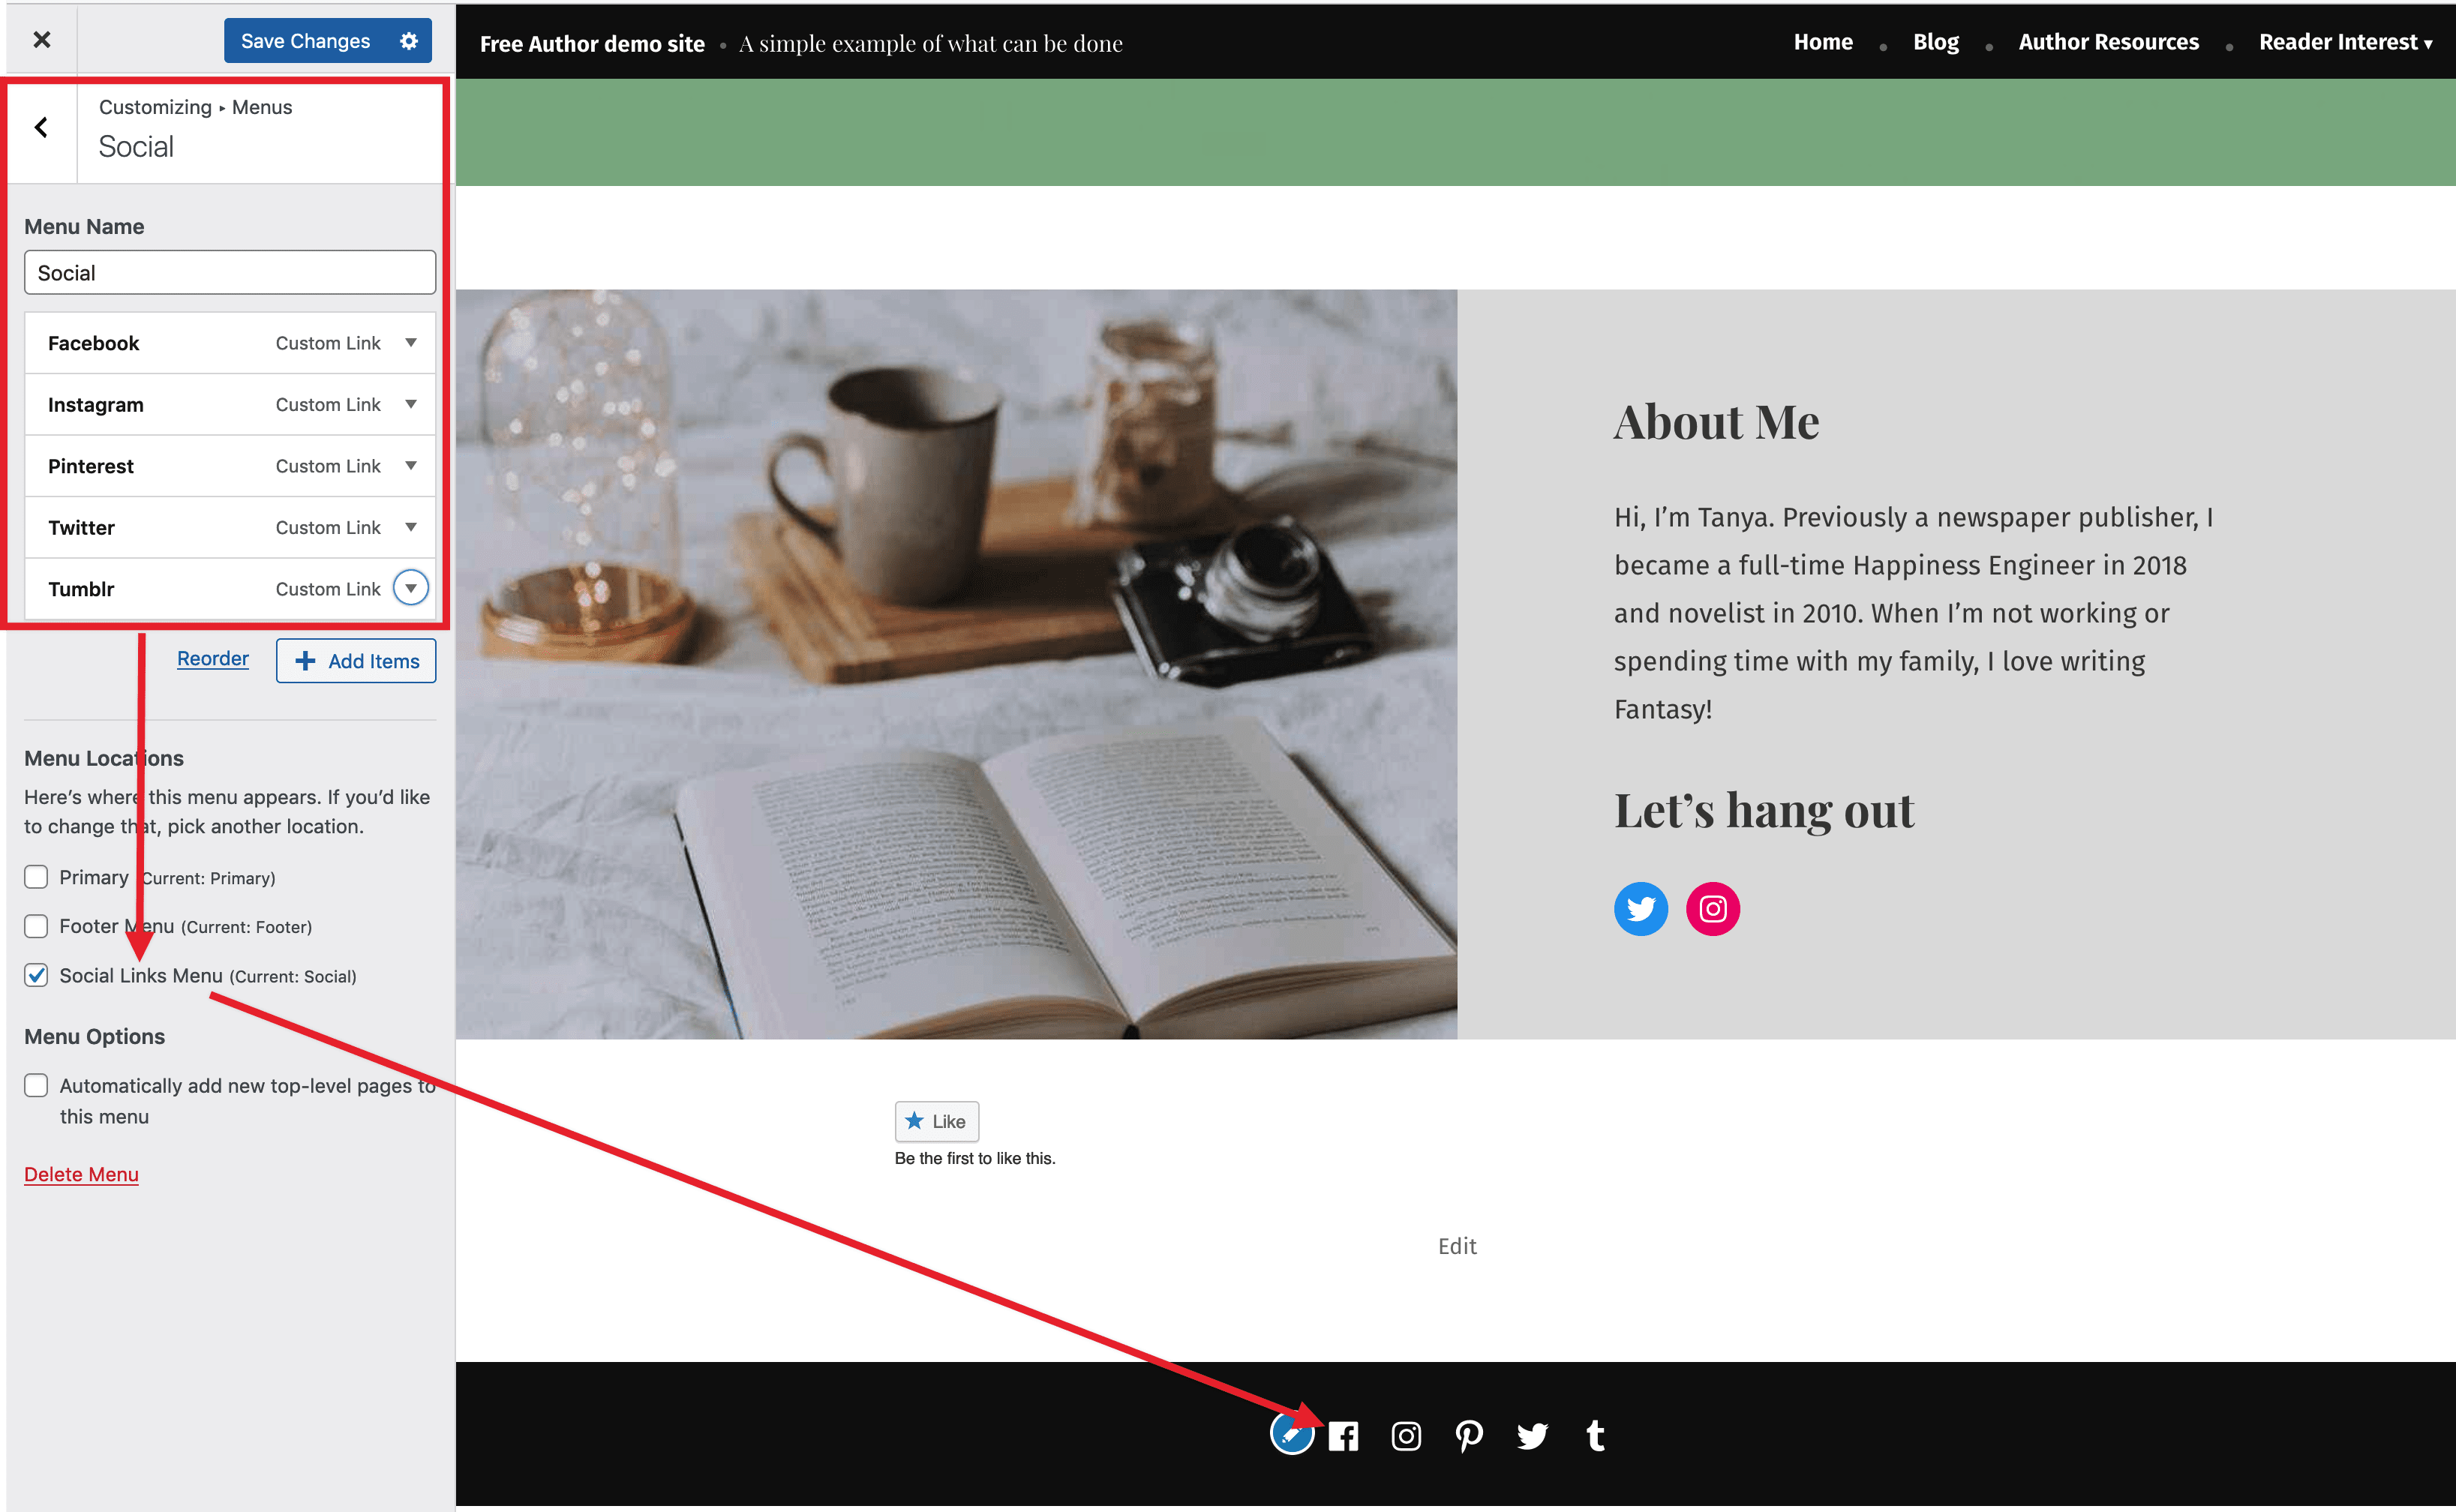
Social Media Menus
You can also strengthen the cross-connection between your website and your social media platforms with the addition of social media menus. Many WordPress.com themes offer a dedicated Social Menu that allows you to connect your site to various social media platforms and display their respective icons on your site.
If your theme doesn’t offer this menu option, you can still create social media-style menus using our Social Icons Block. This ensures that your audience knows how to easily find you on your preferred social media platforms.
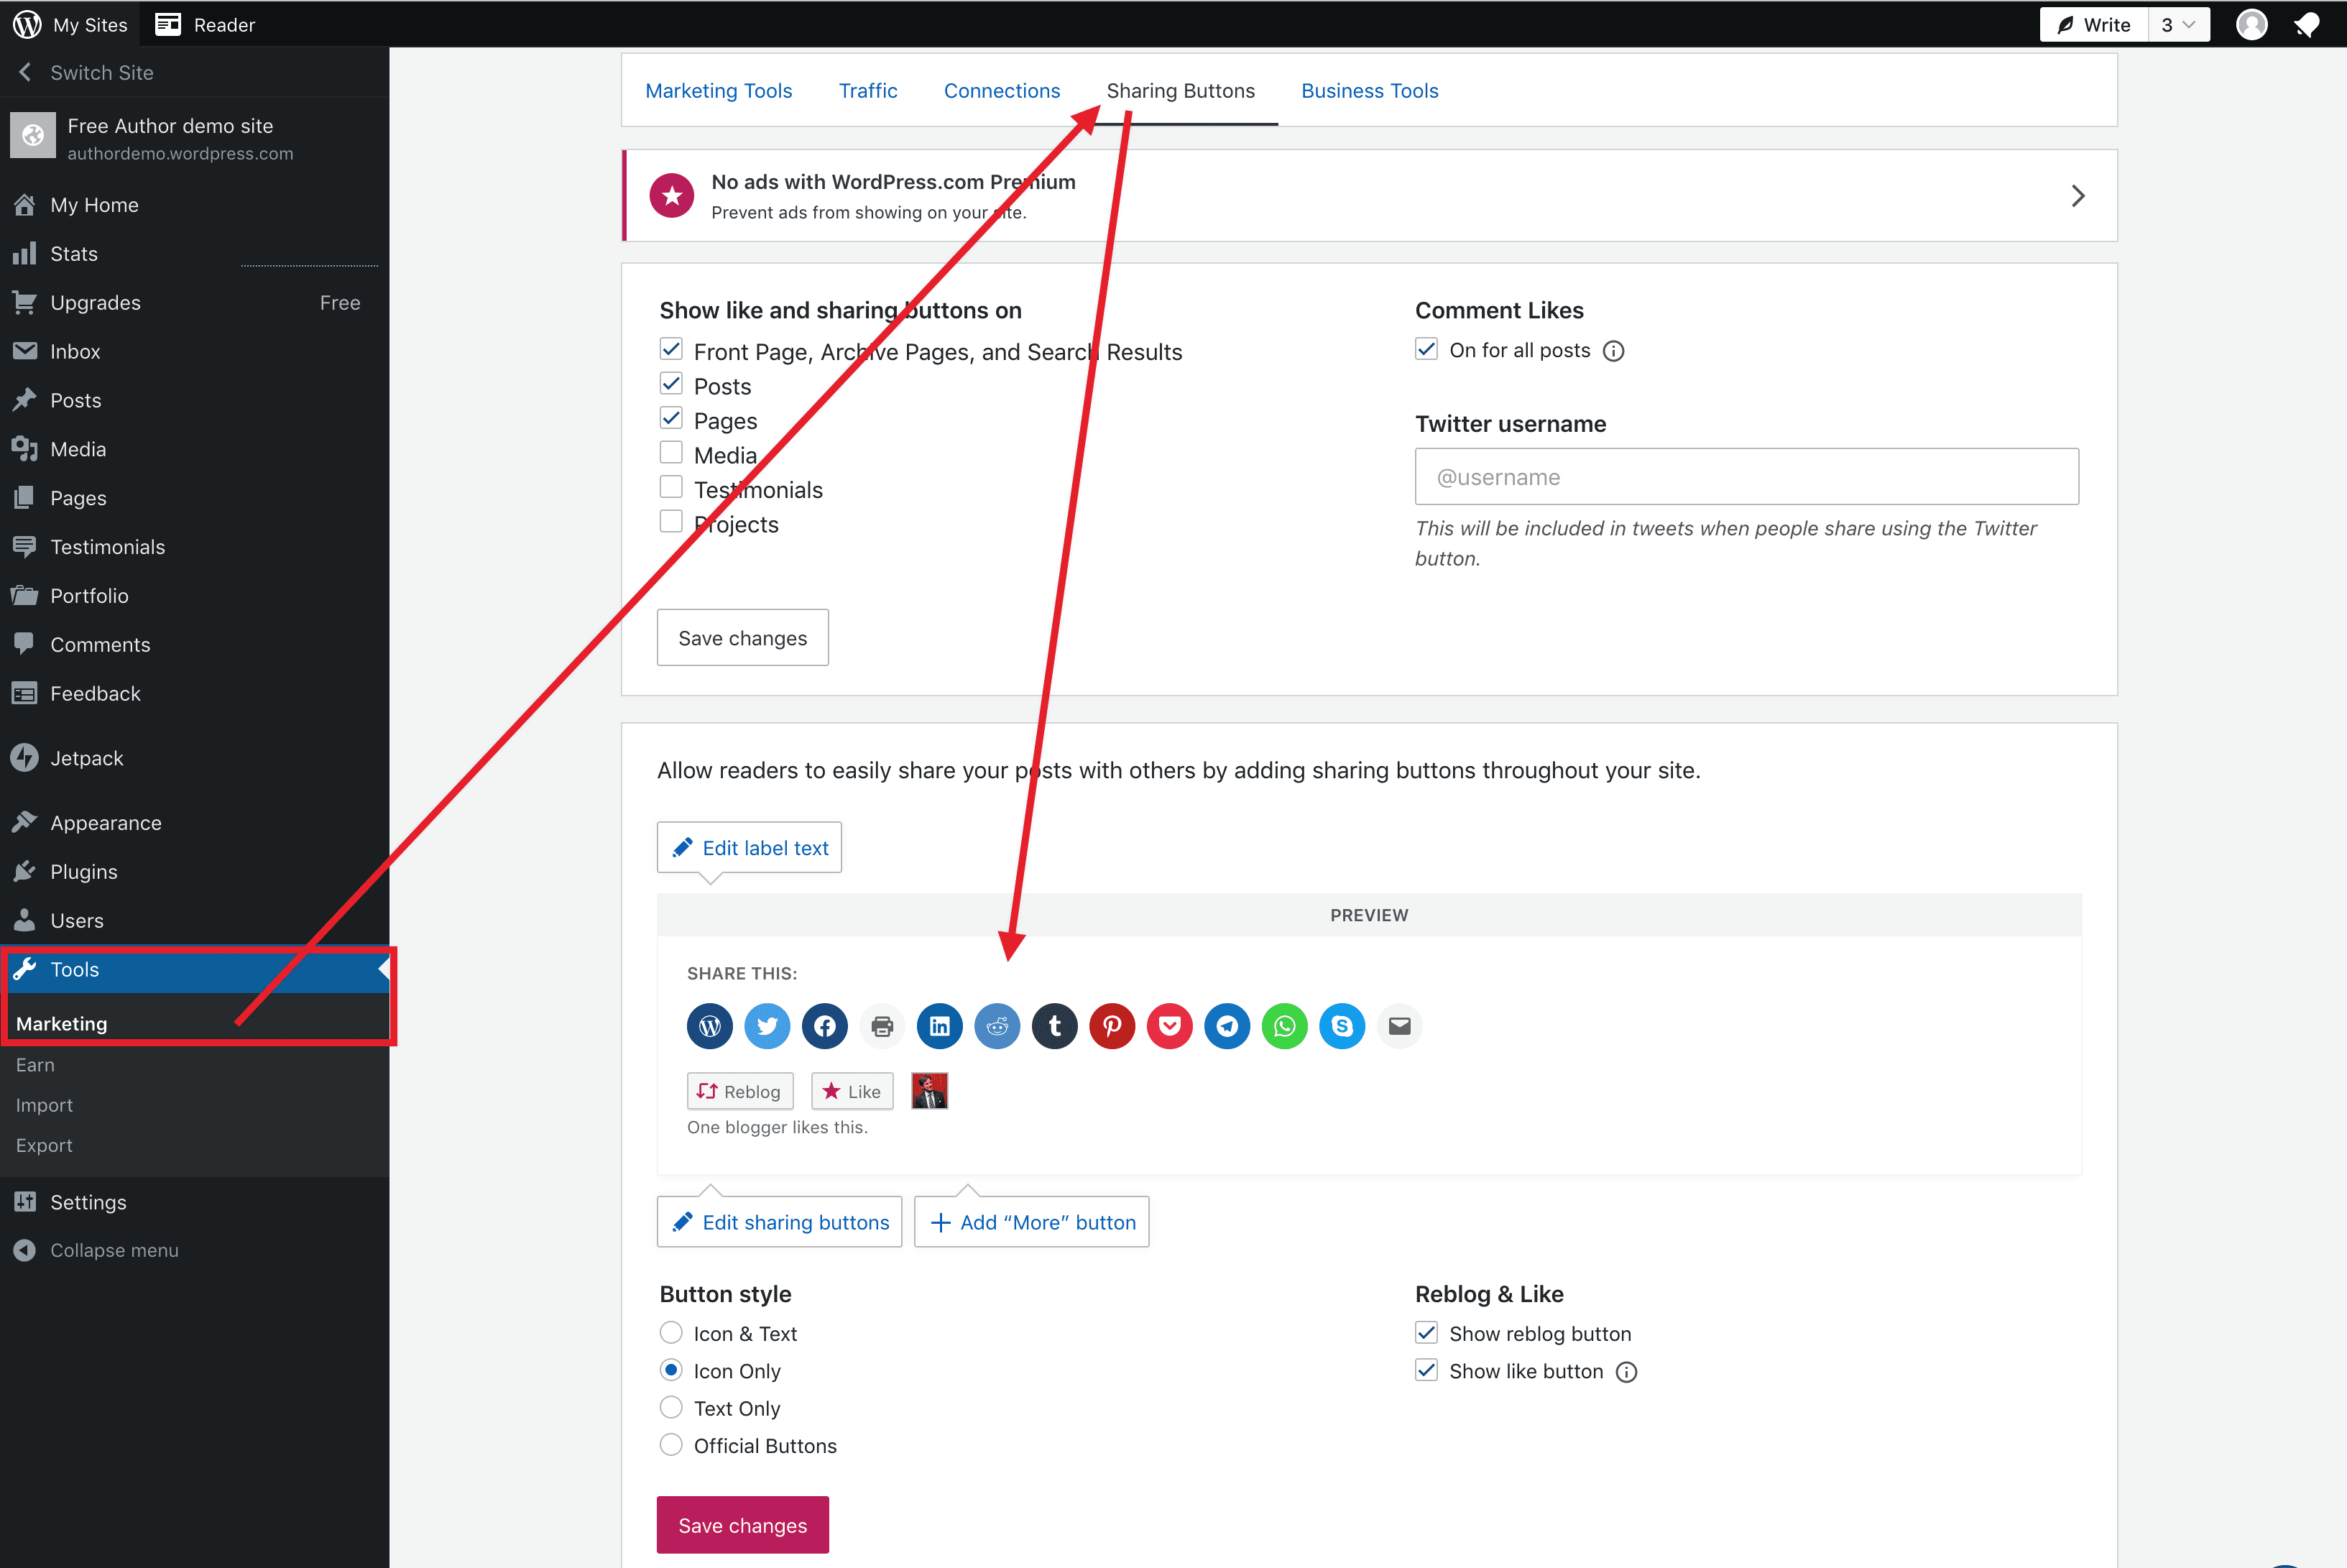
Social Sharing
Last but not least, don’t forget to enlist your visitors to share the love from your website to their social accounts by setting up WordPress.com’s Social Sharing option.
This feature allows you to choose which social platforms you want to encourage your visitors to spread the word by providing a Share button on every piece of content you publish. Nothing connects your audience more than the ability to share.
WordPress.com provides you with multiple built-in tools to make your website the centralized hub for connecting and integrating with your social media platforms—at no additional cost—so you can connect to your audience smoothly and seamlessly, all while driving traffic to your WordPress.com website.
WordPress.com will be hosting a live special topic webinar on Tuesday, February 22, 2022 at 19:00 UTC. Join our WordPress experts to learn all of the essential tips to integrate social media with your website and how to add Link in Bio pages to your website. Register for free today!
- Details
- Category: Dev News
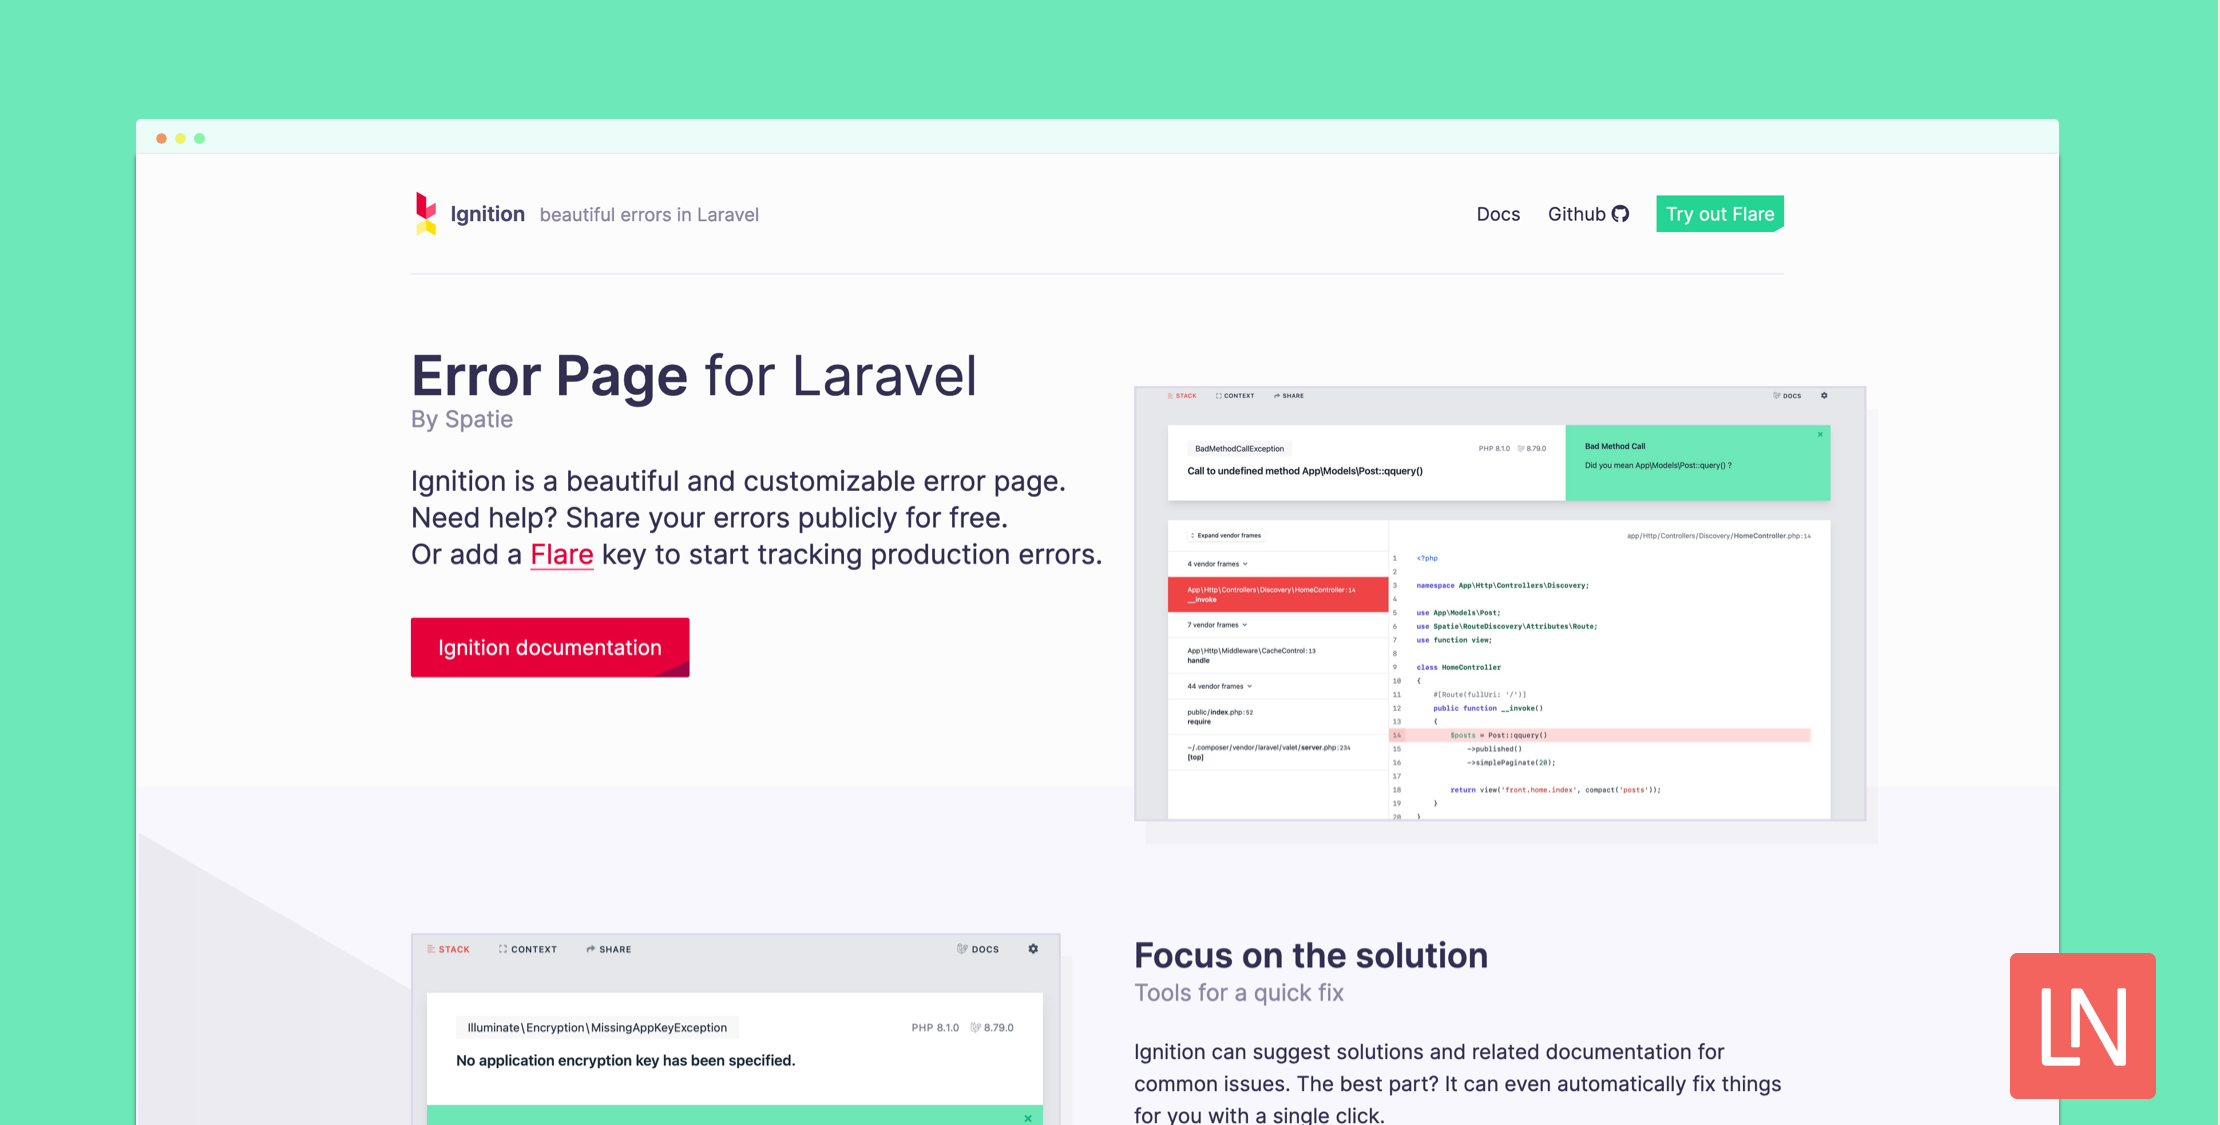
The post A New Major Version of Ignition Debuts in Laravel 9 appeared first on Laravel News.
Join the Laravel Newsletter to get Laravel articles like this directly in your inbox.
Read more https://laravel-news.com/laravel-9-ignition-error-pages