- Details
- Category: Dev News
PhpStorm has good automatic formatting of PHP files based on standards like PSR-2, PSR-12, Symfony, Laravel, etc.; however, there have not been a lot of options for consistently formatting blade files in PhpStorm until recently. There are whispers of Blade formatting coming to Laravel Pint, but another interesting option is using the JavaScript's Prettier code formatting tool with the prettier-plugin-blade plugin.
Matt Stauffer's article How to set up Prettier On a Laravel App, Linting Tailwind Class Order and More is an excellent primer to formatting Tailwind and Blade using Prettier.
Here's the gist of the Prettier configuration file:
{
  "plugins": ["prettier-plugin-blade", "prettier-plugin-tailwindcss"],
  "overrides": [
    {
      "files": [
        "*.blade.php"
      ],
      "options": {
        "parser": "blade"
      }
    }
  ]
}
Once you have configured Prettier, you can quickly set up formatting on save in PhpStorm by navigating to Languages & Frameworks > JavaScript > Prettier. Update your settings to reflect the following:

Specifically, you'll want to add blade.php to the
"Run for files" pattern. The full pattern should be:
**/*.{js,ts,jsx,tsx,vue,astro,blade.php}. Make sure
that "Run on save" is checked, and now Blade files will be
automatically formatted. If you've enabled the
prettier-plugin-tailwindcss plugin, Tailwind classes
will be sorted as well!
If you want to reformat code manually, you can also use the
"Reformat Code" action (the shortcut for me is
Alt+Super+l) to format any file using the configured
formatter.

Related: Jeffrey Way's PhpStorm Setup in 2024
The post Automatic Blade Formatting on Save in PhpStorm appeared first on Laravel News.
Join the Laravel Newsletter to get all the latest Laravel articles like this directly in your inbox.
Read more https://laravel-news.com/automatic-blade-formatting-on-save-in-phpstorm
- Details
- Category: Dev News
Read more https://build.prestashop-project.org/news/2024/upcoming-live-update-april-2024/
- Details
- Category: Dev News

PhpStorm, the PHP IDE by JetBrains, released version 2024.1 this week with a brand new terminal, local AI code completion, Pest improvements, and more.

Here's the list of highlights from this release:
- New terminal
- Full line code completion with local AI
- Sticky lines pinned to the top in the editor
- Pest Improvements
- PHPUnit 11.0 support
- Support for Symfony’s AssetMapper
- Improvements to
dd(),var_dump(), and Symfony'svar-dumper - Check for vulnerable packages in
composer.json - Frontend updates
- Option to scale down the entire IDE (i.e., 90%, 80%, etc.)
- Static method completion for the
class-stringtype - In-editor code review
- Local filtering in the data editor
Learn More
Jeffrey Way's PhpStorm Setup in 2024 is an excellent way to set your editor up quickly for productive workflow for PhpStorm. Jeffrey also has a PhpStorm for Laravel Developers course on Laracasts, which is a 2 1/2 hour course showing you everything you need to know about being productive with PhpStorm.
See JetBrains PhpStorm blog for a detailed look at What’s New in PhpStorm 2024.1.
The post PhpStorm 2024.1 Is Released With a Integrated Terminal, Local AI Code Completion, and More appeared first on Laravel News.
Join the Laravel Newsletter to get all the latest Laravel articles like this directly in your inbox.
Read more https://laravel-news.com/phpstorm-2024-1-0
- Details
- Category: Dev News
When it comes to website-building, WordPress themes set your site up for success by providing stylish, preselected options for fonts, colors, and layouts. Even though themes provide the overall aesthetic, you still need to build out the posts, pages, and templates on your site. That’s where block patterns come in!
The WordPress.com Pattern Library is your new go-to resource for finding any kind of pattern for your beautiful WordPress website. With hundreds of pre-built patterns to choose from across over a dozen categories, you’ll be covered no matter your website’s specific needs.
What are patterns?
Block patterns are collections of blocks made to work seamlessly with our modern themes. Need an “About” page? Check. A gallery? Check. A testimonial? Check. How about a newsletter? Check. We have just about anything you’ll need.
Best of all: for each pattern, the fonts, colors, and spacing will adapt to your theme’s settings, making for a cohesive look. Still, patterns aren’t locked or static either—after you’ve added the pattern to your post, page, or template, you can tweak it however you like.
A tour of the Pattern Library
This new public Pattern Library allows you to browse, preview, and easily share or implement whichever design speaks your tastes. Let’s take a look around.
Browse all categories

If you want to explore the Pattern Library and don’t have anything in particular that you’re looking for, click through each category to spark some ideas.
Search for what you need
At the top, you’ll find a fast and easy-to-use search box, allowing you to find exactly what you need. This is a great option if you don’t feel like browsing and want to jump right into a solution for your specific needs.
Explore page layouts
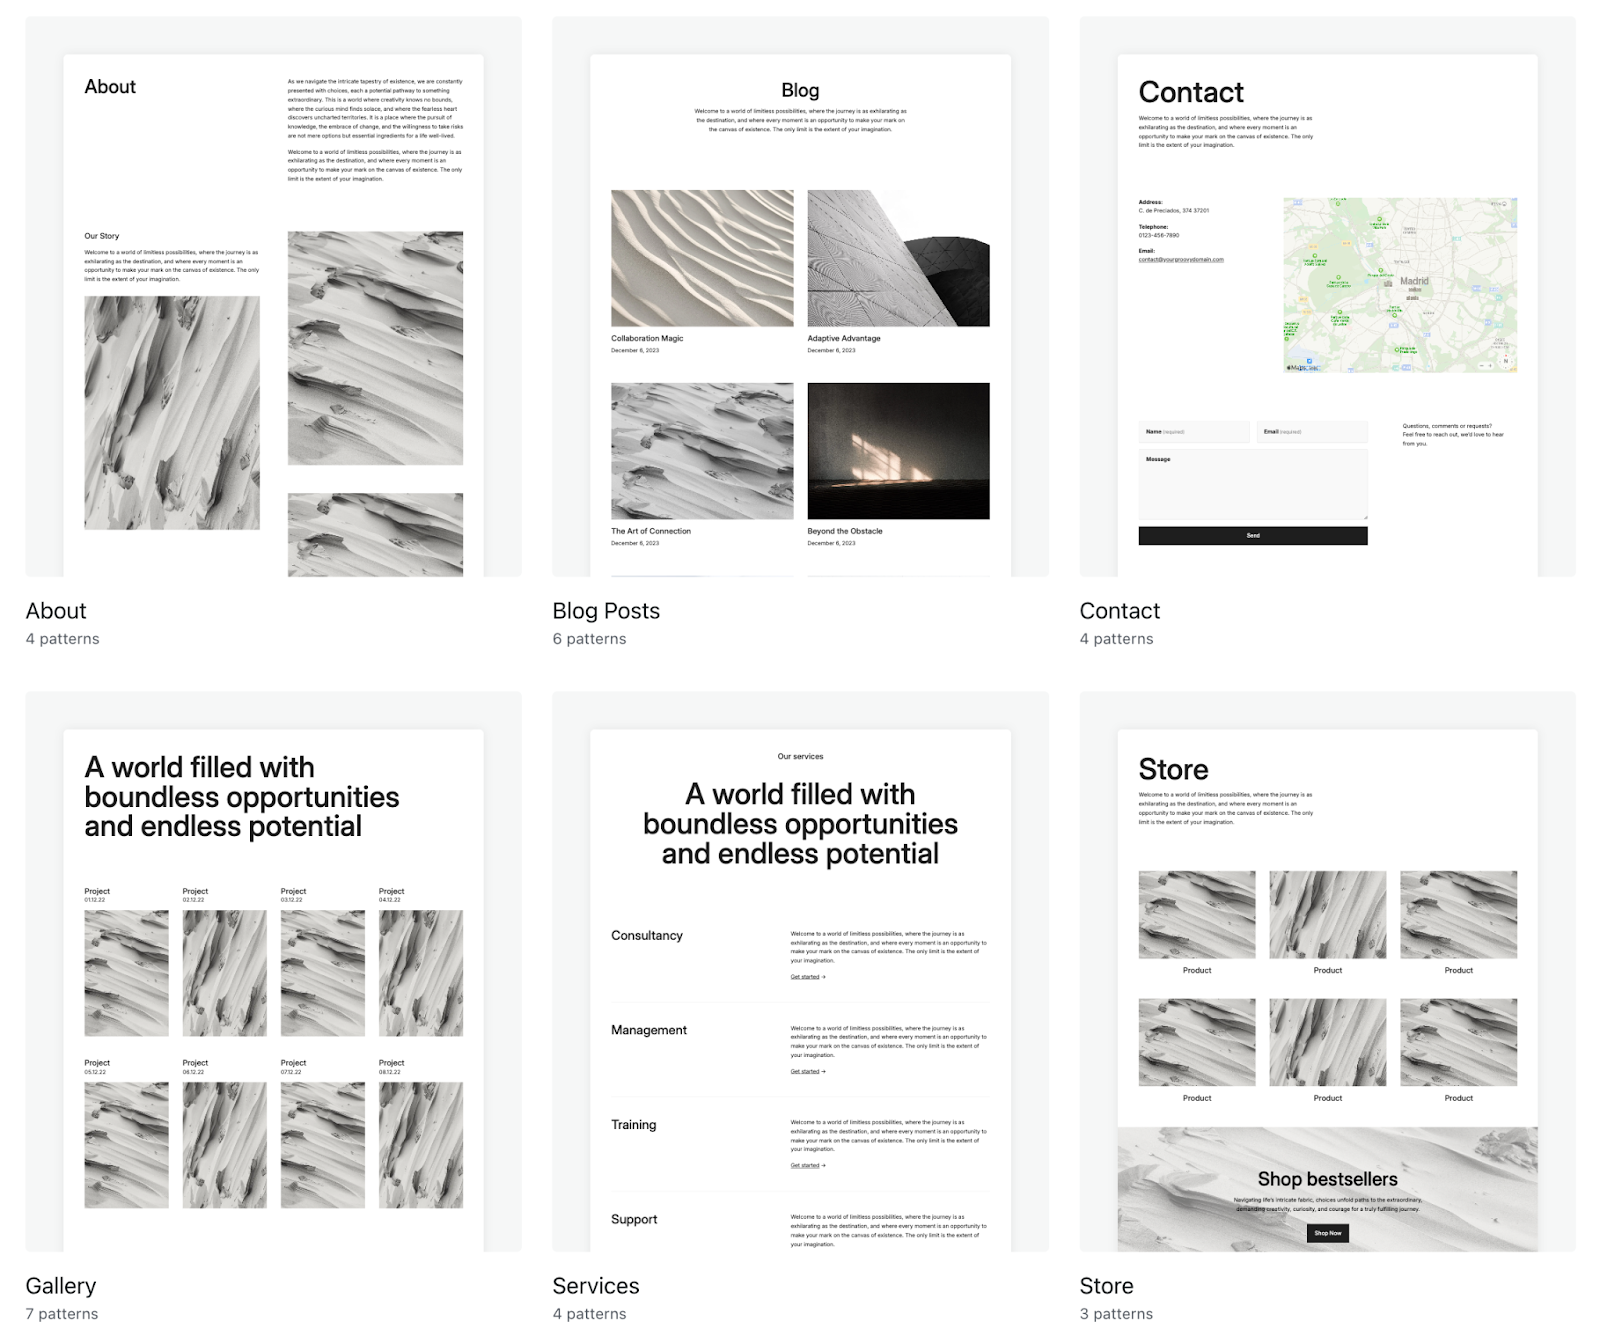
Sometimes you just need the components of a post, page, or template: a header, a “Subscribe” box, a store module, etc. Other times, you want to be able to copy and paste an entire page into existence. Scroll down past the categories and you’ll find our full-page patterns for whole pages: About, Blog, Contact, Store, and more.
Test the mobile responsiveness for each pattern
When looking through the library on a desktop or laptop device, you’ll see a gray vertical bar next to each pattern. That’s a nifty little slider that we’ve built into the library which allows you to see how each pattern responds to different screen sizes. Using your cursor to move the bar to the left, you’ll see what that design looks like on a mobile device; in the middle is where most tablets fall; and scroll back all the way to the right for the desktop/laptop version.
Copy and paste to your website
Like what you see? Simply click the blue “Copy pattern” button, open the WordPress.com editor to the post, page, or template you’re working on, and paste the design. It’s that easy. Once inserted, you can customize each block as needed using the right sidebar.
Your new favorite page-building tool
The Pattern Library is especially useful if you build websites for clients. Each pattern is built to work with any theme that follows our technical standards, speeding up page-building not just for you but also for your clients—all while maintaining the overall style of your theme.
In concrete terms, this means that our patterns take font, color, and spacing settings from the theme itself rather than using standard presets. This makes it far less likely for a site to break (or just look off) when you—or a client—experiment and make updates.
Our goal is always to make your life both easier and more beautiful. This new resource does just that. Check out the WordPress.com Pattern Library today to enhance your website-building experience!
Take me to the patterns!Read more https://wordpress.com/blog/2024/04/10/pattern-library/
- Details
- Category: Dev News

This week, the Laravel team released v11.3, which includes multi-line text in Laravel Prompts, a Session:hasAny() method, a Context::pull() method, and more.
Multi-line Text Prompts
Joe Tannenbaum contributed a textarea function to Laravel prompts that accepts multi-line text from a user:

The textarea() function includes an optional
validation argument as well as a required argument to make sure the
textarea is filled out:
use function Laravel\Prompts\textarea;

$story = textarea(
    label: 'Tell me a story.',
    placeholder: 'This is a story about...',
    required: true,
    hint: 'This will be displayed on your profile.'
);

// Validation
$story = textarea(
    label: 'Tell me a story.',
    validate: fn (string $value) => match (true) {
        strlen($value) < 250 => 'The story must be at least 250 characters.',
        strlen($value) > 10000 => 'The story must not exceed 10,000 characters.',
        default => null
    }
);
See the textarea() function documentation for usage details and Pull Request #88 in the laravel/prompts repository for
the implementation.
New Session hasAny() Method
Mahmoud
Mohamed Ramadan contributed a hasAny() method to
sessions, which is a nice improvement when checking to see if any
values are in the session:
// Before
if (session()->has('first_name') || session()->has('last_name')) {
    // do something...
}

// Using the new hasAny() method
if (session()->hasAny(['first_name', 'last_name'])) {
    // do something...
}
Context Pull Method
@renegeuze contributed a pull() and
pullHidden() method to the Context service, which
pulls the contextual data and immediately removes it from
context.
$foo = Context::pull('foo');
$bar = Context::pullHidden('foo');
An example use-case for this feature might be capturing context for database logging and pulling it because the additional context is no longer needed.
Release notes
You can see the complete list of new features and updates below and the diff between 11.2.0 and 11.3.0 on GitHub. The following release notes are directly from the changelog:
v11.3.0
- [10.x] Prevent Redis connection error report flood on queue worker by @kasus in https://github.com/laravel/framework/pull/50812
- [11.x] Optimize SetCacheHeaders to ensure error responses aren't cached by @MinaWilliam in https://github.com/laravel/framework/pull/50903
- [11.x] Add session
hasAnymethod by @mahmoudmohamedramadan in https://github.com/laravel/framework/pull/50897 - [11.x] Add option to report throttled exception in ThrottlesExceptions middleware by @JaZo in https://github.com/laravel/framework/pull/50896
- [11.x] Add DeleteWhenMissingModels attribute by @Neol3108 in https://github.com/laravel/framework/pull/50890
- [11.x] Allow customizing TrimStrings::$except by @grohiro in https://github.com/laravel/framework/pull/50901
- [11.x] Add pull methods to Context by @renegeuze in https://github.com/laravel/framework/pull/50904
- [11.x] Remove redundant code from MariaDbGrammar by @hafezdivandari in https://github.com/laravel/framework/pull/50907
- [11.x] Explicit nullable parameter declarations to fix PHP 8.4 deprecation by @Jubeki in https://github.com/laravel/framework/pull/50922
- [11.x] Add setters to cache stores by @stancl in https://github.com/laravel/framework/pull/50912
- [10.x] Laravel 10x optional withSize for hasTable by @apspan in https://github.com/laravel/framework/pull/50888
- [11.x] Fix prompting for missing array arguments on artisan command by @macocci7 in https://github.com/laravel/framework/pull/50850
- [11.x] Add strict-mode safe hasAttribute method to Eloquent by @mateusjatenee in https://github.com/laravel/framework/pull/50909
- [11.x] add function to get faked events by @browner12 in https://github.com/laravel/framework/pull/50905
- [11.x]
retryfunc - catch "Throwable" instead of Exception by @sethsandaru in https://github.com/laravel/framework/pull/50944 - chore: remove repetitive words by @findseat in https://github.com/laravel/framework/pull/50943
- [10.x] Add
serializeAndRestore()toNotificationFakeby @dbpolito in https://github.com/laravel/framework/pull/50935 - [11.x] Prevent crash when handling ConnectionException in HttpClient retry logic by @shinsenter in https://github.com/laravel/framework/pull/50955
- [11.x] Remove unknown parameters by @naopusyu in https://github.com/laravel/framework/pull/50965
- [11.x] Fixed typo in PHPDoc
[@param](https://github.com/param)by @naopusyu in https://github.com/laravel/framework/pull/50967 - [11.x] Fix dockblock by @michaelnabil230 in https://github.com/laravel/framework/pull/50979
- [11.x] Allow time to be faked in database lock by @JurianArie in https://github.com/laravel/framework/pull/50981
- [11.x] Introduce method
Http::createPendingRequest()by @Jacobs63 in https://github.com/laravel/framework/pull/50980 - [11.x] Add @throws to some doc blocks by @saMahmoudzadeh in https://github.com/laravel/framework/pull/50969
- [11.x] Fix PHP_MAXPATHLEN check for existing check of files for views by @joshuaruesweg in https://github.com/laravel/framework/pull/50962
- [11.x] Allow to remove scopes from BelongsToMany relation by @plumthedev in https://github.com/laravel/framework/pull/50953
- [11.x] Throw exception if named rate limiter and model property do not exist by @mateusjatenee in https://github.com/laravel/framework/pull/50908
The post Laravel Prompts Adds a Multi-line Textarea Input, Laravel 11.3 Released appeared first on Laravel News.
Join the Laravel Newsletter to get all the latest Laravel articles like this directly in your inbox.
Read more https://laravel-news.com/laravel-11-3-0